作品タイトル:小さいけど、感動できるジオラマを作ってみました。
表示名:ななぱぱ
| コンセプト・作品説明 |
|---|
| 動かせるジオラマを常設できる人は限られていると思います。今回考えたのは、小さくても感情移入できるジオラマ。 小さいジオラマとして最適化。最適化の手法として、電子工作でLEDをコントロールします。 |
ジオラマの製作
ジオラマの作り方についてはWebで検索してください。私のとっかかりは、東京都立産業技術高専の学園祭で教わったのがきっかけでした。

参考にしたページはこちらです。
https://railway-models.net/201607/1826/
この部分が大幅に出来を左右します。自信がない、手っ取り早く入手したいときは、ヤフオクで買うのも手です。
車両の知識
今回のジオラマでは、車両の電装の仕組みが大事です。
ライトを点灯させたい場所は、電車の場合、大きく分けて3か所です。
ヘッドライト、テールライト、室内灯です。
機関車+貨車の場合、室内灯は必要ないかもしれません。
で、どれも初めから点灯するわけではありません。
Nゲージでは、線路に通電する極性で、進行方向とヘッドライト、テールライトの点灯を決めます。
というわけで、ヘッドライトと、テールライトは、ダイオードを用いて、点灯を切り替えます。
ヘッドライトとテールライトの追加は、後には引けない加工が必要なので、初めから付いている模型をお勧めします。
室内灯は、ダイオードブリッジを用いて、どちらの極性でも点灯するように組み込みます。
こちらは、メーカーオプションで装着するもよし!
自作するもよしです。
http://mokei1968-train.blog.jp/archives/1023608305.html
これで、夜景に車両が奇麗に浮かび上がります。
ジオラマの背景について
背景の昼、夕、夜のコントロールを、考えました。
昼、夕、夜の空の色を考えました。
青色の輝度をコントロールするだけで、ある程度、表現できます。
電球色のLEDの明るさをGR-ADZUKIのモータ出力でコントロールします。
電球はダイソーの電球型LEDライトがお勧めです。5Vで動作するのでADZUKIで簡単に調光出来ます。

接続先はこちら

室内灯の点灯方法
ヘッドライト、テールライト、室内灯はレールに12Vを接続することで点灯します。
その向きは、極性を入れ替えることで切り替えます。
GR-ADZUKIは12Vをコントロール出来ないので、12Vはリレーを介してコントロールします。
12VのACアダプタの出力を2回路のリレーに接続。出力側に接続したみのぐちクリップを介して、レールに接続します。
リレーは以下のどちらでも大丈夫です。
オムロン G5V-2 DC5
5V小型リレー 接点容量:2A 2回路C接点 941H-2C-5D
http://akizukidenshi.com/catalog/g/gP-01229/
部品の接続
※注意
電球型LEDLIGHTの接続は、実際にプログラムを書き込み、出力側の電圧を確認してから、接続してください。
モータードライブ出力を使っているので、設定によっては、極性を逆に出力することができます。
逆に出力した場合、部品が故障する場合があります。

ジオラマの組み込み方

背景の布は、空色の生地を本返し縫いで縫い付けました。
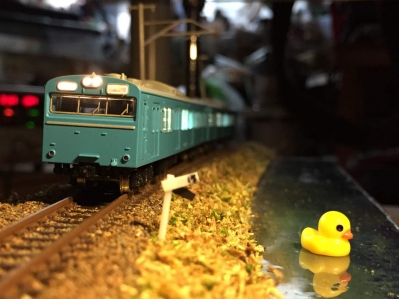
仕上がり


いかがですか?
ソースコード
以下に、ソースを貼り付けます。
GR4IDEで書き込むことができます。
const int buttonPin1 = 2; // the number of the pushbutton pin
const int buttonPin2 = 3; // the number of the pushbutton pin
int light =0;
int sen =0;
int ledf = 0; // the number of the pushbutton pin
int ledPin = 9; // the number of the LED pin
int ledping = 10;
int rlPin = 6;
int rlping = 11;
int buttonState1 = 0; // variable for reading the pushbutton status
int buttonState2 = 0; // variable for reading the pushbutton status
const int analogInPin1 = A0; // Analog input pin that the potentiometer is attached to
const int analogInPin2 = A1; // Analog input pin that the potentiometer is attached to
const int analogInPin3 = A2; // Analog input pin that the potentiometer is attached to
const int analogOutPin = 9; // Analog output pin that the LED is attached to
int sensorValue1 = 0; // value read from the pot
int outputValue1 = 0; // value output to the PWM (analog out)
int sensorValue2 = 0; // value read from the pot
int outputValue2 = 0; // value output to the PWM (analog out)
int sensorValue3 = 0; // value read from the pot
int outputValue3 = 0; // value output to the PWM (analog out)
void setup() {
pinMode(ledping, OUTPUT);
digitalWrite(ledping, LOW);
pinMode(rlPin, OUTPUT);
digitalWrite(rlping, LOW);
pinMode(ledPin, OUTPUT);
pinMode(buttonPin1, INPUT_PULLUP);
pinMode(buttonPin2, INPUT_PULLUP);
}
void loop(){
sensorValue1 = analogRead(analogInPin1);
sensorValue2 = analogRead(analogInPin2);
sensorValue3 = analogRead(analogInPin3);
outputValue2 = map(sensorValue2, 0, 1023, 0, 255);
if (sensorValue1 > 300)
{
sen = 1;
}
else
{
sen = 0;
}
if (sensorValue2 < 50)
{
light = 1;
}
else
{
light = 0;
}
ledf = sen + light ;
if (sen == 1)
{
analogWrite(analogOutPin, outputValue2);
digitalWrite(rlPin, HIGH);
}
else
{
analogWrite(analogOutPin, 0);
digitalWrite(rlPin, LOW);
}
}
親子で電子工作と合わせてハッカソンをたのしんでます。
子供に喜んでもらえるものを作るのたのしいですよね。
本業は、いろいろなガスを測る仕事しています。