
Title:.NET Micro Framework with GR-PEACH
Displayed Name:Yoshitaka Seo

| Concept / Overview |
|---|
| Hello! My name is Yoshitaka Seo. Both at work and at home, I can almost always be found developing something using Microsoft technology. This article reflects developments at the level of embedded systems technology I have achieved using .NET Micro Framework. But now with the Cloud considered to be general-purpose technology and the term IoT no longer just a buzzword, we will see more and more opportunities to employ embedded systems technology in our developments. I would like to take this opportunity to introduce .NET Micro Framework from my perspective to those of you deeply familiar with embedded systems and GR-PEACH. I will cover everything from establishing a development environment to basic programming in logical order. I hope this article encourages you to try developing with .NET Micro Framework, a GR-PEACH board, and your own PC. |
.NET Micro Framework and Visual Studio
I would say the most prominent features of GR-PEACH are its large-capacity RAM and high-performance CPU.
Another key characteristic is the board’s multi-platform capabilities.
GR-PEACH supports 4 types of platforms:
- mbed
- Arduino
- .NET Micro Framework
- TOPPERS/ASP

Taken from http://gadget.renesas.com/ja/product/peach.html
I am guessing there are many readers who are quite familiar with mdbed and Arduino, yet don’t know much about .NET Micro Framework.
As indicated by the name, .NET Micro Framework is a member of Microsoft’s .NET family.
Compared to .NET Framework for PCs, .NET Micro Framework runs with a limited range of functions. For example, .NET Micro Framework does not include functions that are not considered essential to embedded applications, such as ASP.NET, the web app implementation framework, or performance data access. This greatly reduces the amount of memory required at run time.
At the same time, .NET Micro Framework is great for simple functions like sensor and actuator input/output as well as network-related functions. This platform allows you to easily develop embedded devices useful in various IoT uses.
A common concern is the cost of establishing the development environment. For the individual developing software as a hobby or evaluation, Visual Studio Community 2015(https://www.visualstudio.com/)is publicly available to the users for free. Functionally, this is basically the same as the commercial Visual Studio Professional version. There are no specific functional restrictions.
For working in the Cloud, you can register for Visual Studio Dev Essentials(https://www.visualstudio.com/products/visual-studio-dev-essentials-vs) for free, and receive a 25 USD Microsoft Azure credit (right to use) once a month. If you only need it for experimenting or verification, I think you can get by with the monthly credit, avoiding any extra costs.
Note that neither Visual Studio Community nor Visual Studio Dev Essentials can be used for commercial purposes. You will need to purchase the Visual Studio Professional if developing software for commercial use.
How to Prepare the Development Environment
Here I will explain how to go about preparing the development environment. First, download and install the following tools in the order indicated. None of the processes required are particularly difficult, but do pay close attention to the instructions in step No. 2.
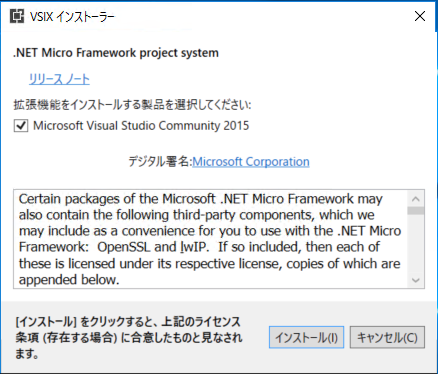
- Install Visual Studio
For non-commercial use, download the installer for Visual Studio Community (https://www.visualstudio.com/) and execute the file.
For commercial use, please purchase and install the commercial version.
- After Visual Studio is completely installed, boot up the software, go to the menu and select
Tools --> Options. This will open the option window. Under the "Expansion Function and Update Program" tab, remove the check from the box next to Automatically update expanded function.
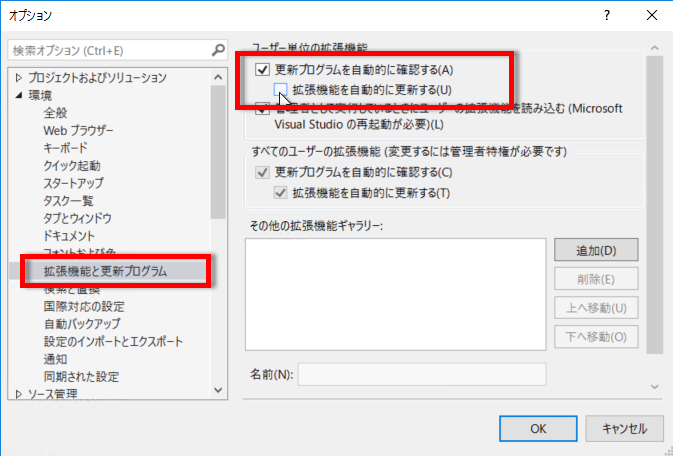
- Currently, version 4.4 is the latest update of .NET Micro Framework. But most .NET Micro Framework boards, including GR-PEACH, are installed with version 4.3 QFE2. If the box remains selected (checked) as it is in the above screen shot, when you install the software, the .NET Micro Framework SDK will be automatically updated to version 4.4, and it won’t be able to generate a compatible execute file for GR-PEACH. To ensure that your system will generate the correct execute file, make sure you complete this step.
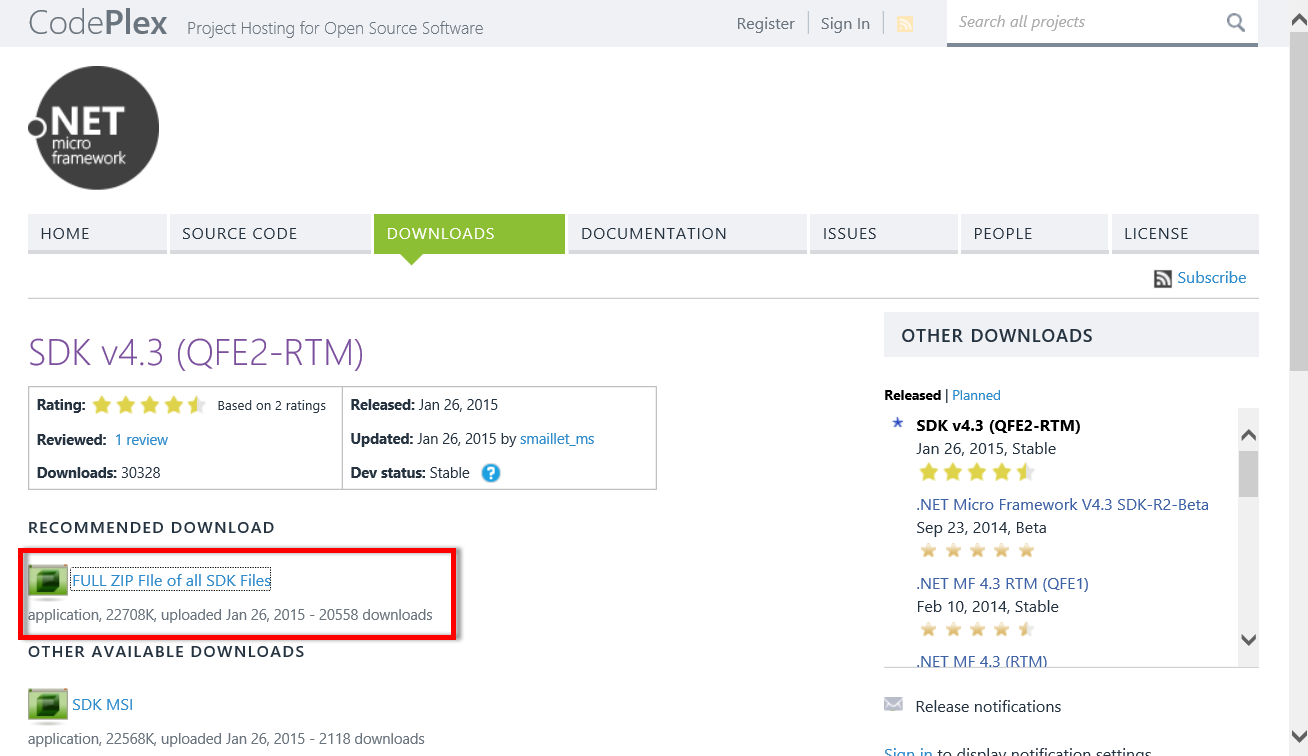
- Install .NET Micro Framework SDK V4.3 (QFE2)
The installer for preparing the Visual Studio does not include the .NET Micro Framework development function. After installing the Visual Studio program itself, you will need to install the .NET Micro Framework SDK. Download SDK v4.3 from here:
http://netmf.codeplex.com/releases/view/611040
When you decompress the ZIP file you will see various files listed.
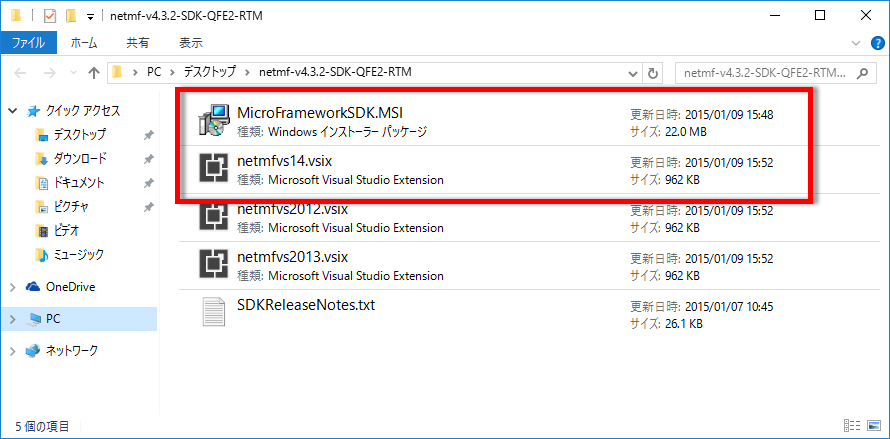
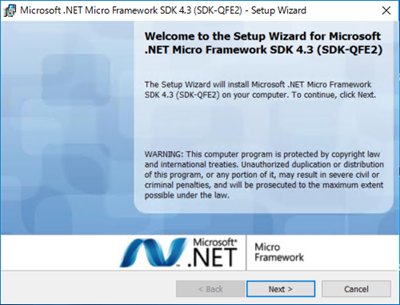
Install the SDK, which is listed as “MicroFrameworkSDK.MSI.”
Also install the “netmfvs14.vsix” file found in the ZIP file. This will display the .NET Micro Framework items in Visual Studio.
Install .NET Micro Framework Firmware
Next, install the .NET Micro Framework firmware on GR-PEACH.
Note: When using GR-PEACH in the Windows 10 Anniversary Update environment (“Windows 10 AU” herein), you will need to use the Windows updated program KB3176934.
If, for some reason, the Windows 10 AU on your PC is not ready for KB3176934, you will need to update your GR-PEACH firmware by updating your PC with something other than Windows 10 AU. Please keep this in mind when installing the firmware.
https://developer.mbed.org/teams/Renesas/wiki/How-to-update-firmware-for-GR-PEACH
For the discussions in this article, we used a GR-PEACH which was “not ready” for GR-PEACH 20160811 firmware, and confirmed operations with the following PC combinations.
- Windows 8.1 PC
- Windows 10 AU + KB3176934 non-ready PC
- Windows 10 AU + KB3176934 ready PC
All screen shots in this article were taken from a Windows 8.1 PC.
1. Download .NET Micro Framework Firmware
The GR-PEACH .NET Micro Framework firmware is available for free at the following URL:
http://netmf.codeplex.com/releases/view/611040
Download the latest firmware version from the site.
Note that v4.4 and later versions on the public site have been changed from codeplex to github. When you need to obtain the newest version in the future, please refer to http://netmf.github.io/.

2. Copy firmware to GR-PEACH
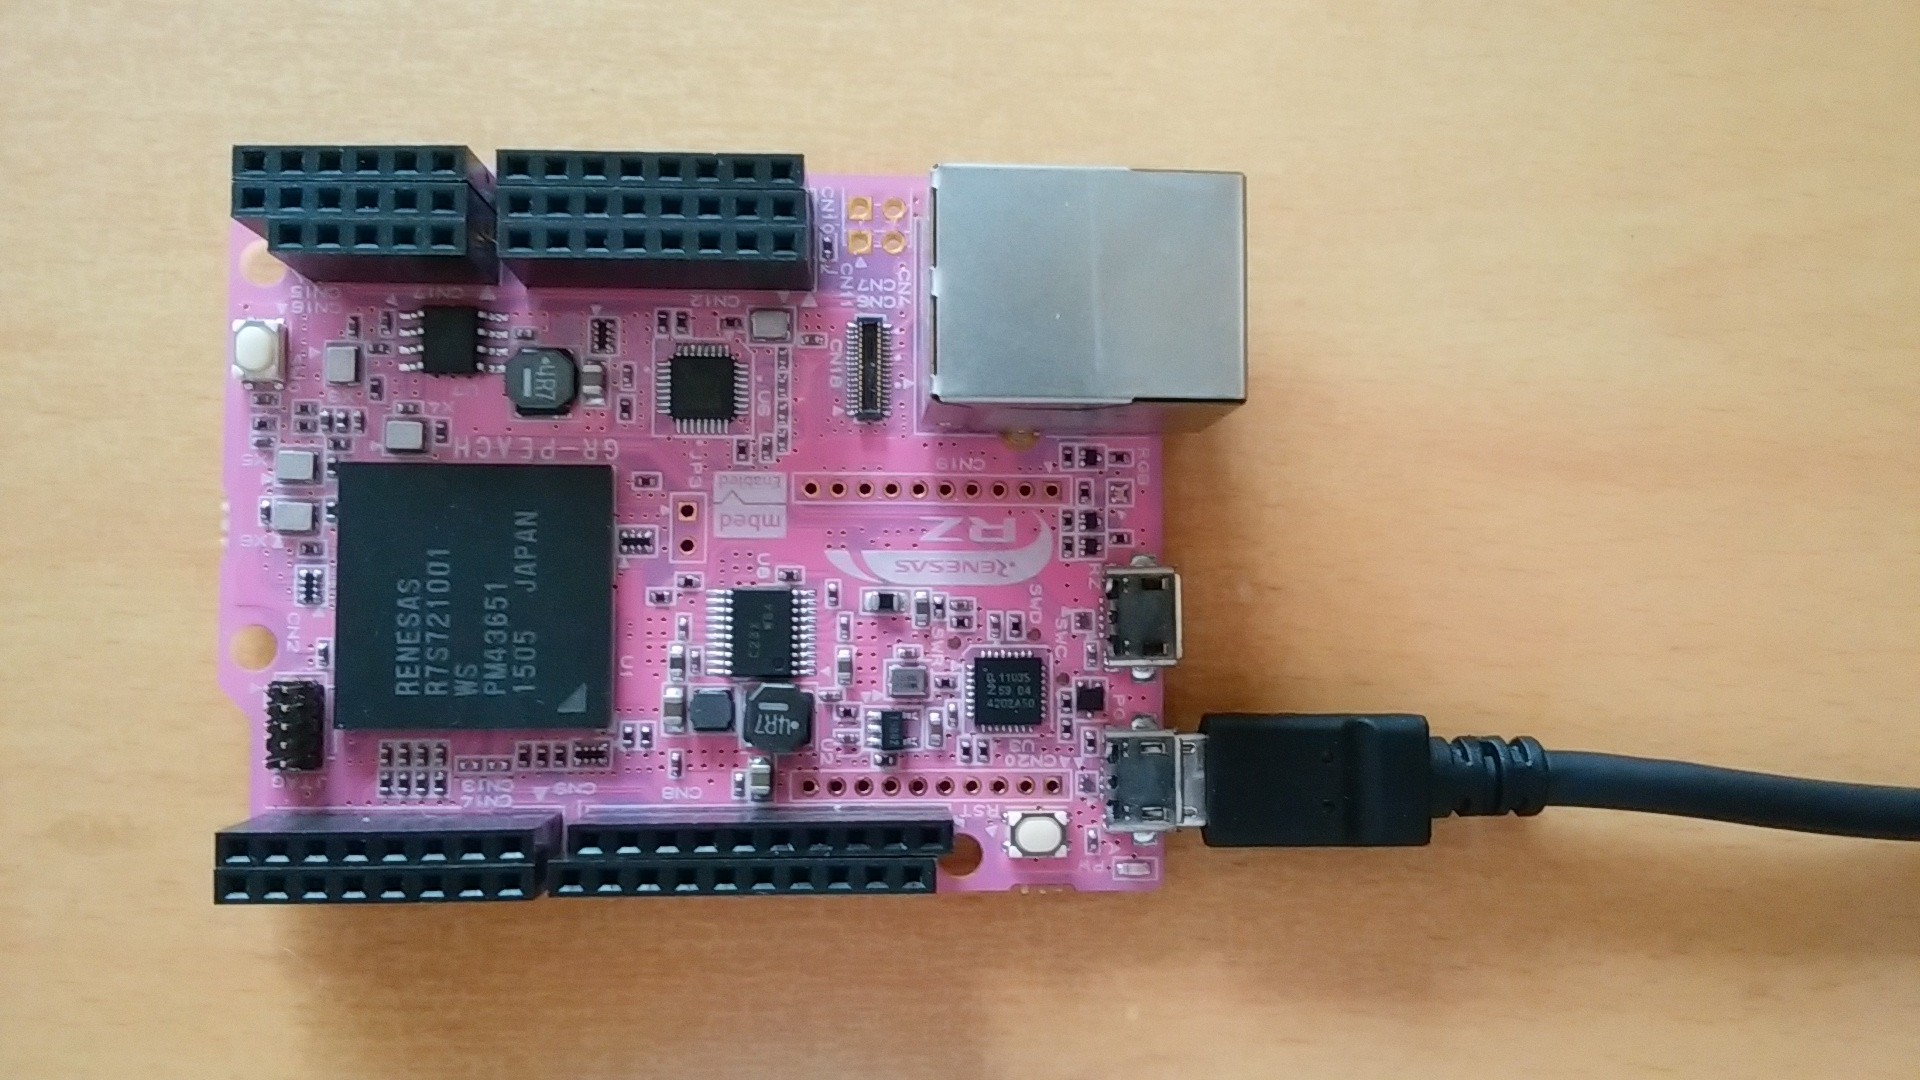
Decompress the downloaded ZIP file and then connect GR-PEACH to your PC with a USB cable. When installing the firmware, insert the cable in the external connector on GR-PEACH as shown here.
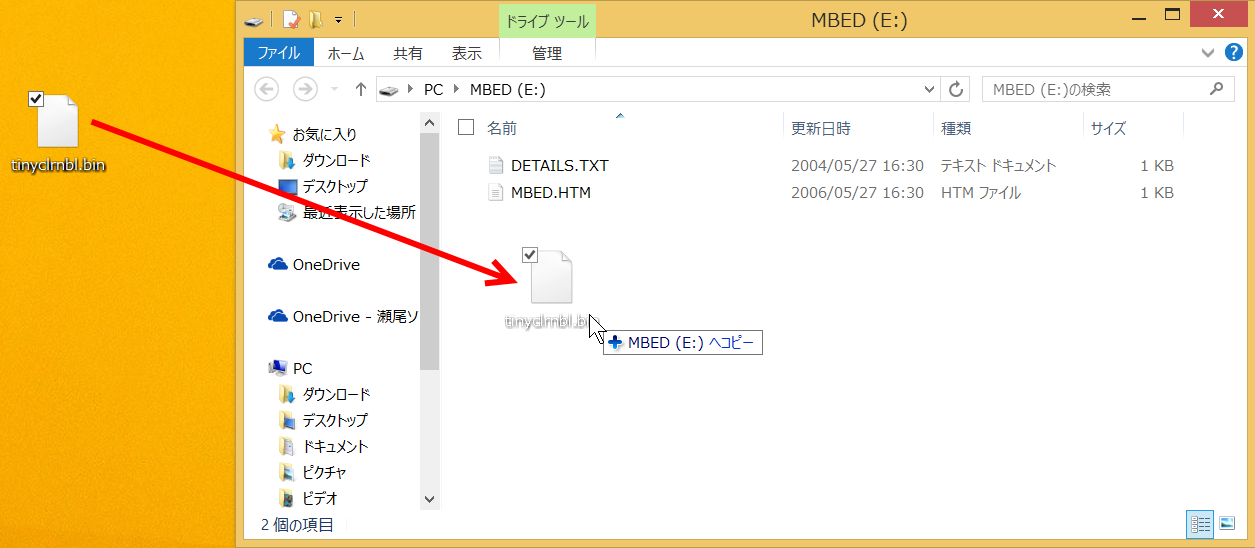
GR-PEACH works as an external drive, so you can simply drop the decompressed firmware in the GR-PEACH Explorer. Copying the firmware takes a few minutes to complete. Once completed, Explorer will automatically shut down and then re-open. The copied file looks like it has disappeared, but don’t worry. This is fine!
This completes the firmware installation.
3. Confirm .NET Micro Framework startup
Connecting the USB cable to the GR-PEACH on-board USB connector automatically starts the .NET Micro Framework firmware.

4. Confirm firmware deployment/operations
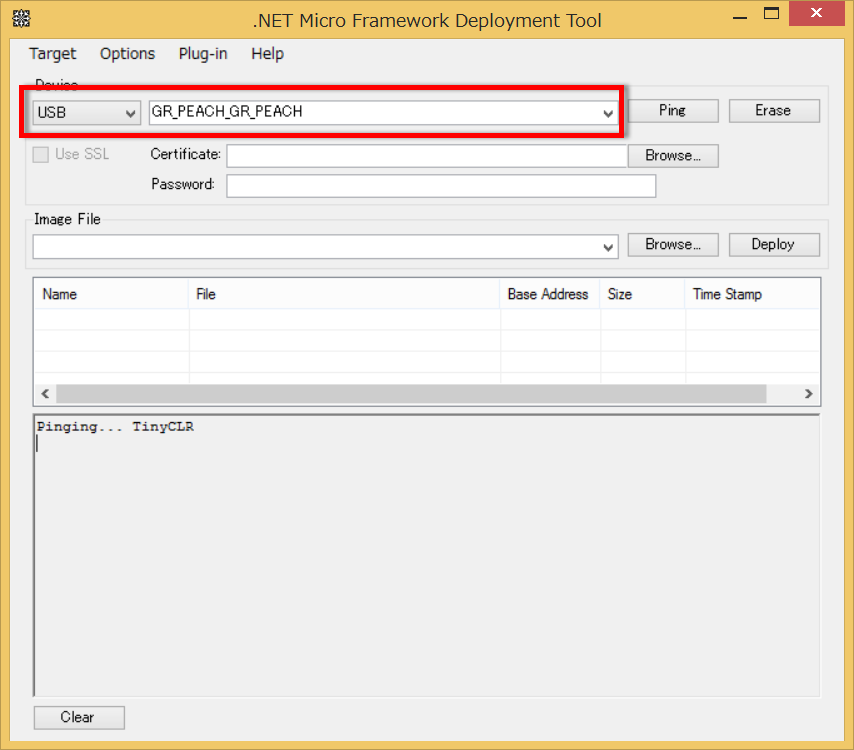
In this step you will confirm that the .NET Micro Framework firmware is running properly. Confirm operations with the “.NET Micro Framework Deployment Tool” (mfdeploy) which was bundled with the .NET Micro Framework SDK installed in the previous procedure.
Start mfdeploy while the PC is connected to the GR-PEACH on-board USB connector. “GR_PEACH_GR_PEACH” should appear when you select USB under Device, Next, click the Ping button.
This should display “Pinging...TinyCLR” at the bottom of the window, indicating that .NET Micro Framework is running properly.
Basic Development Procedure (1): create Blink LED code
With the development environment ready to use, let’s take a look at the basic development process.
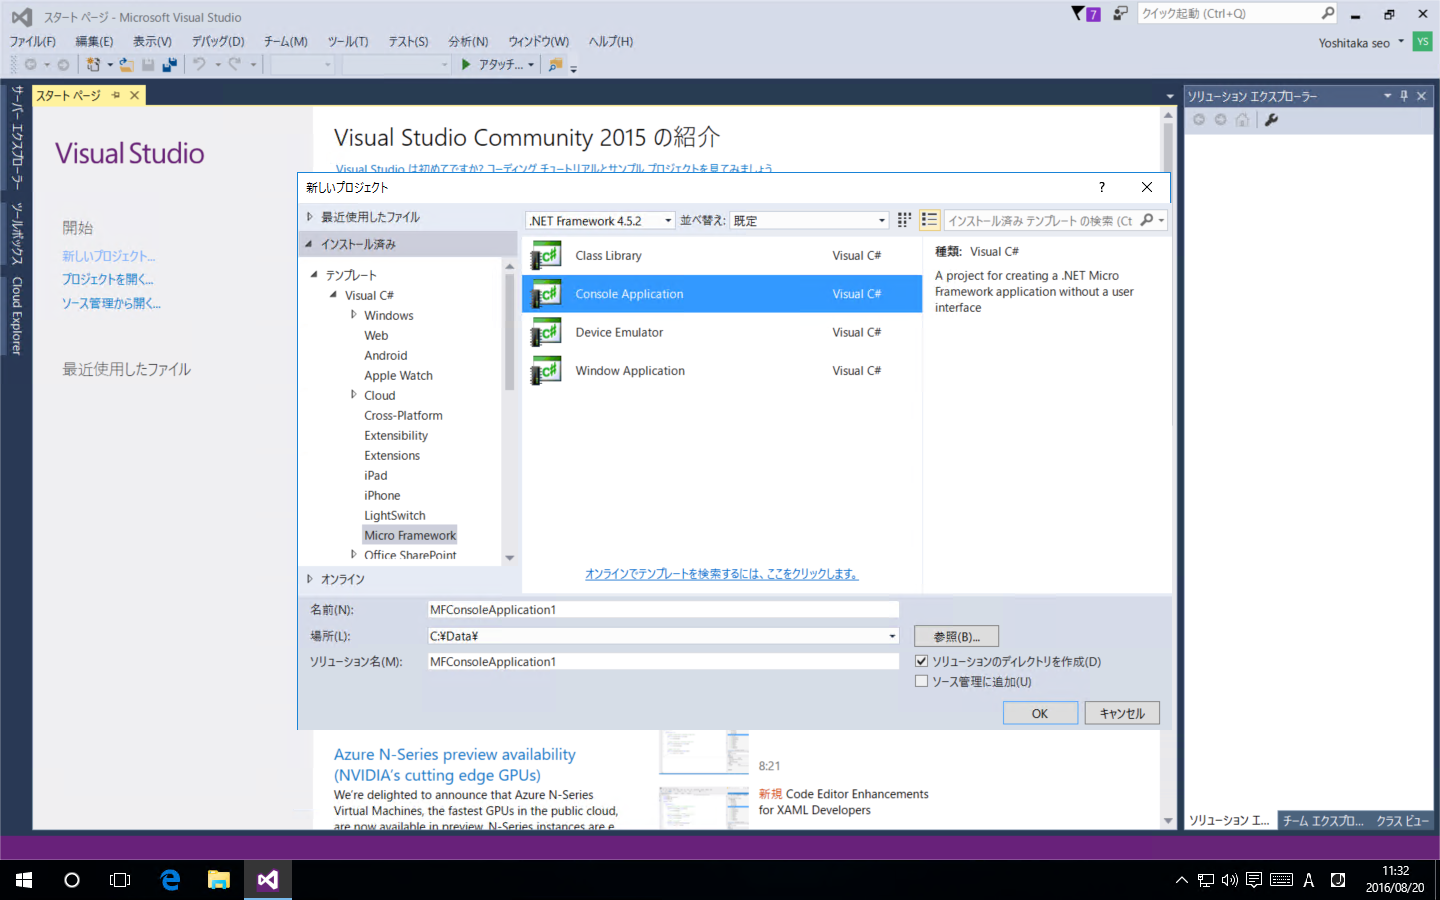
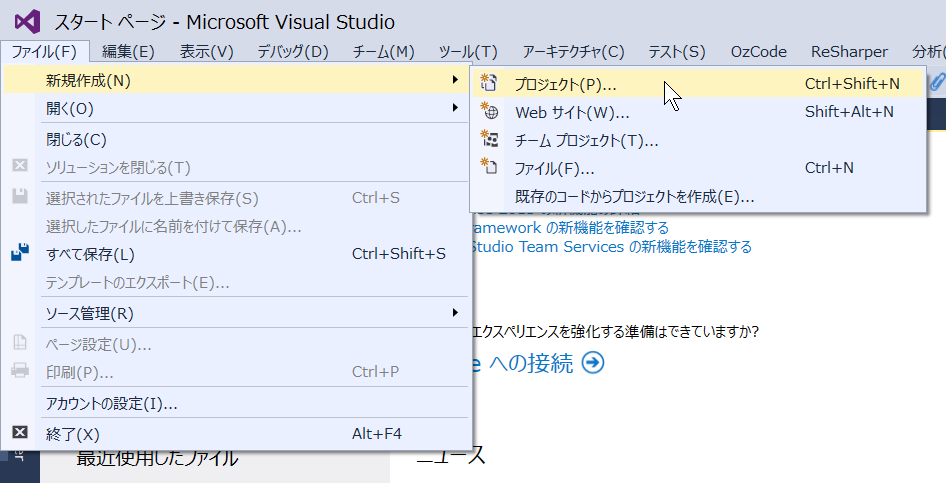
1. Create a new project
Start up Visual Studio and create a new project by going to File --> Create New Project --> Project.
In the dialog box, select Visual C# --> Micro Framework --> Console Application.
Assign any project name and location (folder) you like. For this explanation, we named the project “MFConsolApplication1”. The new project template appears after a few seconds.

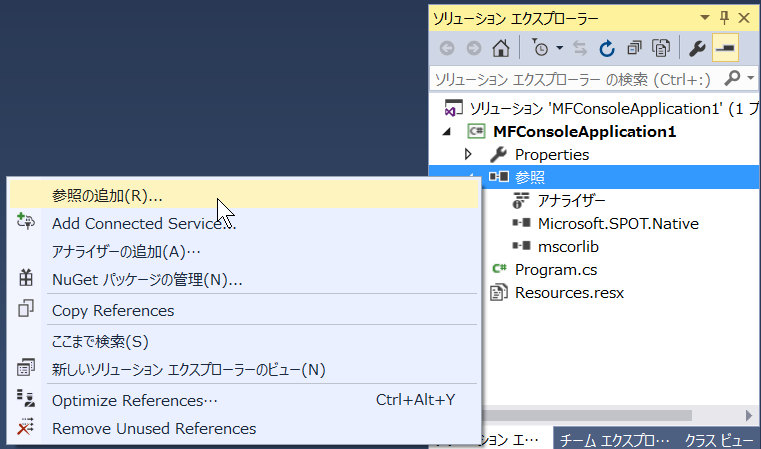
2. Add reference settings
The project created in the previous step does not yet include the libraries considered essential for embedded developments. Let’s add them here!
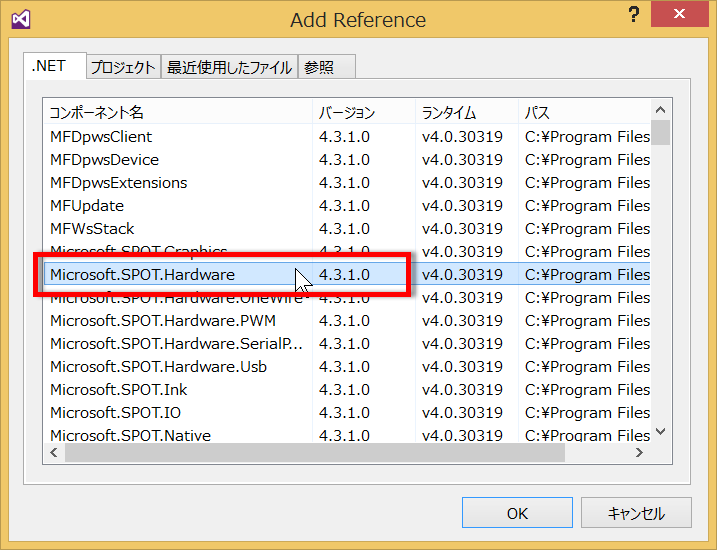
Right click Reference in the Solution Explorer (Reference appears as default in the upper right corner of the window). Select Add Reference. In the new dialog box, select “Microsoft.SPOT.Hardware”.
Microsoft.SPOT.Hardware includes definitions for GPIO, I2C device and others. This step will set you up with all the libraries considered essential to embedded development.
The source code for Blink LED is as follows. Use this to rewrite the automatically generated Program.cs.
using System.Threading;
using Microsoft.SPOT.Hardware;

namespace MFConsoleApplication1
{
    public class Program
    {
        private const Cpu.Pin UserPin = (Cpu.Pin)0x6c;

        public static void Main()
        {
            var led = new OutputPort(UserPin, false);

            while (true)
            {
                led.Write(false);
                Thread.Sleep(1000);
                led.Write(true);
                Thread.Sleep(1000);
            }
        }
    }
}
For readers already familiar with embedded developments, this is probably easy to read, but allow me to provide a simple explanation of the code.
GR-PEACH pins are referred to as Cpu.Pin types. The user LED is pin number 0x6c (the LED on the LAN connector (external), and the on-board multi-colored LEDs are pins number 0x6d (red), 0x6e (green), and 0x6f (blue). Try using these ports for future gadget challenges!
To use each pin for GPIO output, we need to use the OutputPort class. The first argument in the constructor specifies the pin number and the second argument specifies the output port initial value (if false, LED turns OFF).
A full Blink LED is implemented using the OutputPort.Write method to turn the LED ON (true) and OFF (false), with a sleep period in between.
The .NET Micro Framework is provided with the main method as the application’s entry point. When running something simple like Blink LED, you can describe the entire process in the main method as explained above. But more commonly, a separate method is defined and called from the main method as needed.
Basic Development Procedure (2): run Blink LED code
Now that you have written the code, it’s time to send the application to GR-PEACH and run it.
1. Connect your PC to the GR-PEACH on-board USB connector using a USB cable.
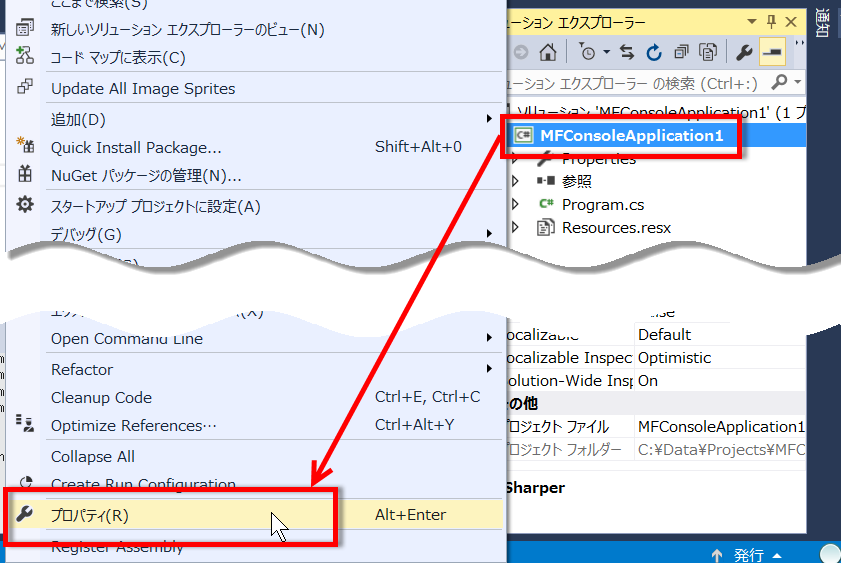
2. In the Visual Studio Solution Explorer (located by default at the upper right corner) right click on the project name and select Properties. The project name is the 2nd line under Solution Explorer (indicated by the C# icon).
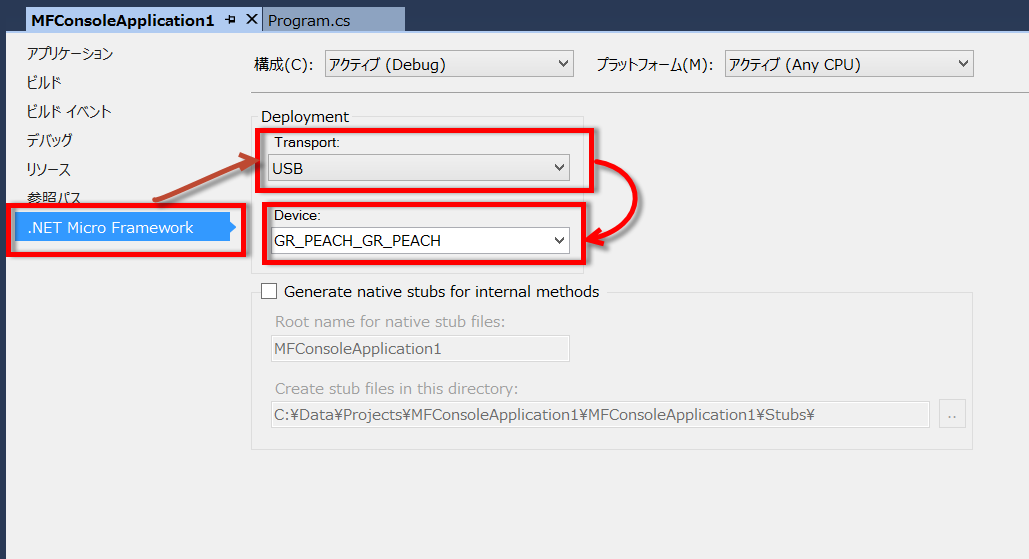
3. In the .NET Micro Framework tab under Deployment, select Transport: USB, then Device: GR_PEACH_GR_PEACH. This completes the settings required to transfer the application to GR-PEACH.
If you find that the nothing appears under Device after you have connected the USB cable, try this: Select Transport: Emulator, and then re-select USB. This should do the trick.
4. In the Visual Studio menu, select Debug --> Start Debug.
After the application is sent to GR-PEACH it will automatically reboot.
The application will start to run after all modiles have been loaded.
Basic Development Procedure (3): get data
- After successfully running Blink LED (output), now it’s time to Get Data (input).
There are three ways to obtain values from sensor data.
- OutputPort: Use this to receive digital data at regular intervals, using a timer for polling.
- InterruptPort: Use this to obtain digital data. Unlike the OutputPort, the value is obtained when there is a change in the status of the port and the system generates an event. Polling is unnecessary as a notice from the system is automatically received.
- AnalogPort: Use this to read out analog data, employing a timer to obtain the data through polling.
Here I will explain how to data from get ON/OFF signals of the GR-PEACH button via the InterruptPort using only GR-PEACH. This is event-driven, very Microsoft-like programming.
First, follow the instructions provided for Blink LED to create the project, set references for Microsoft.SPOT.Hardware libraries, and write to and run the GR-PEACH board.
Here I will introduce the source code. For the purpose of this explanation I have used project name “MFConsoleApplication2”.
using System;
using System.Threading;
using Microsoft.SPOT.Hardware;

namespace MFConsoleApplication2
{
    public class Program
    {
        // GR-PEACH
        private const Cpu.Pin ButtonPin = (Cpu.Pin)0x60;
        private const Cpu.Pin UserPin = (Cpu.Pin)0x6c;

        private static OutputPort _led;

        public static void Main()
        {
            var button = new InterruptPort(ButtonPin, true, Port.ResistorMode.Disabled,Port.InterruptMode.InterruptEdgeBoth);
            button.OnInterrupt += button_OnInterrupt;

            _led = new OutputPort(UserPin, false);

            Thread.Sleep(Timeout.Infinite);
        }

        static void button_OnInterrupt(uint data1, uint data2, DateTime time)
        {
            var isPressed = data2 == 0;
            _led.Write(isPressed);
        }
    }
}
The InterruptPort constructor takes 4 arguments.
var button = new InterruptPort(
There are 6 types of values that can be obtained in the 4th argument, but to begin with, all you need to remember are the following 3 types:
- InterruptEdgeBoth: An event is issued on both rising and falling edges of the signal.
- InterruptEdgeHigh: An event is issued when the signal goes high.
- InterruptEdgeLow: An event is issued when the signal goes low.
In the code described above, button_OnInterrupt method is called from the system when there is a change in the status of the button (OnInterruput).
With GR-PEACH, the signal status can be obtained from data2 in the 2nd argument of button_OnInterrupt method. When data2 is 0, the button is being pushed; when 1, it is not being pushed.
In this program, the LED is ON when the button is pushed and OFF when the button in not pushed.
Expansion Library
For those of you familiar with embedded developments, the .NET Micro Framework code introduce here will be fairly easy to comprehend (even if you are not familiar with detailed grammar of C#). In fact, you will realize that it does not differ greatly from other languages.
So, when you take a good look at the embedded code, you will notice that loop, sleep and similar events are used generously, for actions such as:
- Blinking the LED
- Periodically obtaining environmental sensor data
- Periodically uploading obtained data to the Cloud
Your code can start to look really confusing and become the cause of bugs when you combine what you want the system to do (business logic) with descriptions of loop, sleep
and other structural components.
For example, the processing code that sends a notification that an error has been generated could be significantly simplified. In this case, we replace the conventional and lengthy “make the LED blink 3 times in 200ms intervals” with a shorter “PulseDebugLed(200, 3);”.
Now allow me to introduce the library I developed for GR-PEACH.
https://github.com/netmf-lib-grfamily/GrFamilyLibrary
If you would like to try this out, you can do so by downloading just the previously built DLL. https://github.com/netmf-lib-grfamily/GrFamilyLibrary/tree/master/DLLs)
I have also made all the source codes in the library available to users. Feel free to download and use these to build your own programs.
The source code is easier to use if you understand .NET Micro Framework. I have also included source codes in a class that supports commercial modules, which may serve as a good reference when using GPIO, I2C, or similar modules.
To use the library and source codes:
- To get the expansion library DLL: Download the previously built DLL or get all source codes and then build the DLL yourself.
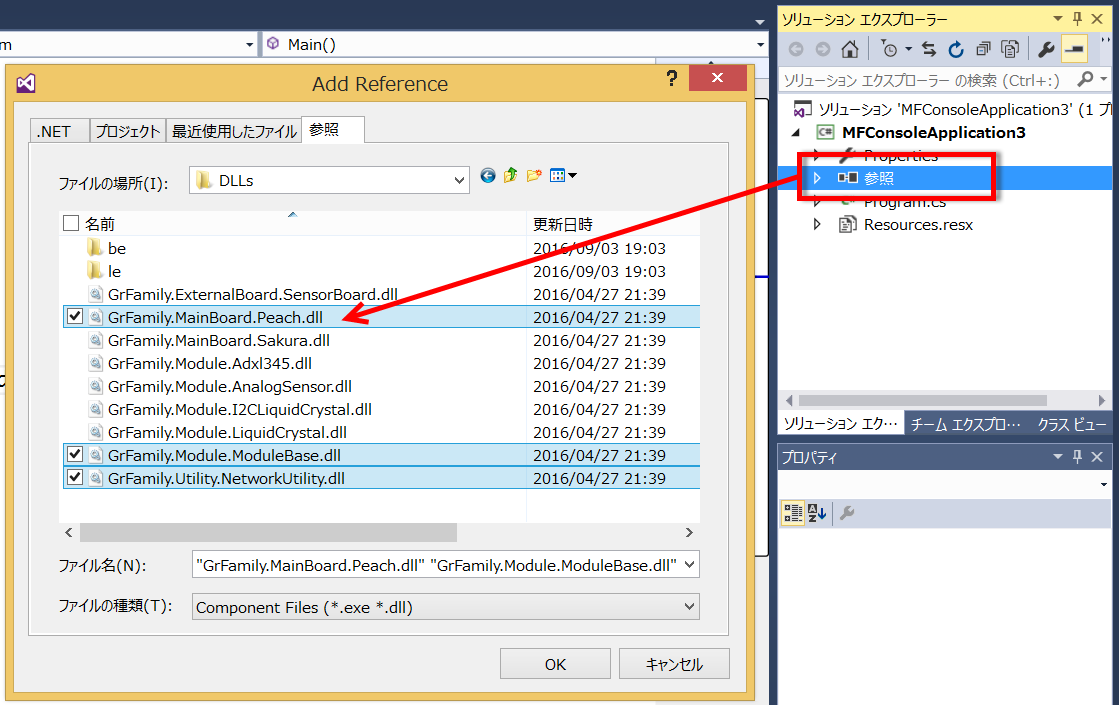
- Setting references for essential libraries in your project: Add references for both Microsoft.SPOT.Hardware and the GR-PEACH library, GrFamily.MainBoard.Peach.
If using the I2C connection module, add GrFamily.Module.ModuleBase; if connecting to a network, add GrFamily.Utility.NetworkUtility.
Refer to the Readme and Help files included in the software for all other libraries.
The next section explains how simple your code can be when using expansion libraries.
We will write a code using button and LED as an example.
1-line programing with expansion library
At this point we will write code using .NET Micro Framework and an expansion library.
Notice that we employ the button and LED on GR-PEACH yet the development process is much easier than that of a conventional development environment.
Creating the project and sending the application to GR-PEACH is the same as previously explained. I also added references for Microsoft.SPOT.Hardware and GrFamily.MainBoard.Peach.
“MFConsoleApplication3” is used as the project name in the description below.
Input the source code as follows.
using System.Threading;
using GrFamily.MainBoard;

namespace MFConsoleApplication3
{
    public class Program
    {
        public static void Main()
        {
            var peach = new Peach();
            peach.Button.ButtonPressed += (sender, state) => peach.PulseDebugLed(200, 3);

            Thread.Sleep(Timeout.Infinite);
        }
    }
}
The process we want to achieve in the application is just 1 line:
peach.Button.ButtonPressed += (sender, state) => peach.PulseDebugLed(200, 3);
Read out loud, this single line says, “When the button on PEACH is pressed, make the DebugLed blink 3 times in 200 milliseconds intervals”.
Of course, an entire system cannot be written in just one line, but the goal is to create code that is as easy to read as what we have achieved here.
In Conclusion
My goal here was to show many of the great benefits of .NET Micro Framework and introduce how to use C# to write code easily.
Using .NET Micro Framework with GR-PEACH also allows easy connection to a network. In a future article, I plan to write about using Microsoft Azure and other cloud services to create IoT applications.
Engaged in development using Microsoft technology on both business and private.
Won the award of Microsoft MVP consecutively from 2009, moreover won for two sections, MVP for Visual Studio and Dev Tech / MVP for Windows Development in 2016 January.
Even it appears as if I'm familier with embed technology, actually I'm not so. I was just able to ride on IOT wave in timely. I'm nervous everyday, wondering if I'm asked further details.
Excited with Blinking LED, it's true that I love.
My favorites are in the wide range, from girl's groups such as NOGIZAKA 46 and/or AKB 48
to musical comedy, Japaneses arts including buddhist statue, paintings on a folding screen etc..
However I am a consistent person, I believe.

Follow