
Title:GR-CITRUS Player
Displayed Name:Noborio

| Concept / Overview |
|---|
| Hello! My name is Noborio. I work for Nyanpas Inc., the company that runs the HaLake co-working space. In this project, I used a pressure sensor with GR-CITRUS and WA-MIKAN to output sound. I will explain how to do this, as well as how to control the sound output via WiFi with a browser-controlled device (PC, smartphone, tablet, etc.). Changing sound with a pressure sensor or remote control was actually one of the projects used for a hackathon, where we wanted to make devices for disabled persons in the co-working space HaLake. We selected GR-CITRUS because of its compact size, and WA-MIKAN because it allowed us to easily replay sound from an SD card. Both devices are really easy to use. Once you get the hand of controlling a device with a pressure sensor, you can create gadgets that will produce sounds based on various triggers for embedding in toys. Learning how to control a device via WiFi will enable to you to use it in a variety of applications. Master these two methods to make your gadget-creating life more fun! |
Emitting sounds with a pressure sensor: mechanism and assembly
The resistance value of a pressure sensor changes while it’s touched. That value change is used by GR-CITRUS to determine the number of taps during a short period. The program selects and plays a music based on the number of taps. The ESP-8266 that comes with WA-MIKAN is not used for this.
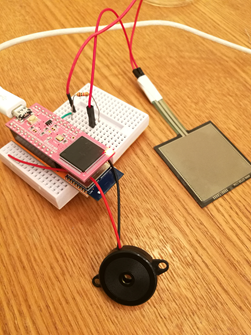
Speaker – GR-CITRUS – Pressure Sensor
WA-MIKAN (reads tunes from SD card) 
The following key components were purchased at Akizuki Denshi:
Sensor: FSR406 pressure sensor
Speaker: SPT15 piezoelectric speaker (piezoelectric sounder)
In addition, we tried an amplifier module as the speaker component and it worked fine.
The following link provides the GR-CITRUS pin map.
http://gadget.renesas.com/ja/product/citrus.html
While referencing the pin map, connect one end of the pressure sensor to GND pin, the other end to the A0 pin and one end of the resister as shown in the picture. The pressure sensor leads are fragile. I suggest using pin-cables, jumper wires, and maybe tape to secure the connection. Then connect the other end of the resister to 3.3V. Also, connect A0 with a jumper wire between the resistor and the sensor. Connect the red cable of the piezoelectric speaker to pin 0 which is Ser.1 TX and the black cable of the piezo to GND.
Store the audio data in an SD card (not included with GR-CITRUS). We configured this gadget based on using MP3 files but WAV files should work just as well.
- S.WAV
- 1.WAV
- 2.WAV
- 3.WAV
- 4.WAV
This gadget is configured so that the S.WAV file sound is output each time the gadget is turned on, and all other sounds are emitted depending on how many times the gadget is tapped.
Emitting sounds with a pressure sensor: implementation
Write this program using the Web compiler provided on the Gadget Renesas site.
The compiler can be downloaded from the following site.
This provides a sample sketch to use on GR-CITRUS as well as a project for playing sounds from your SD card. Both are used as is.
Select GR-CITRUS_MP3_WAV as the template when creating your project, as shown below.
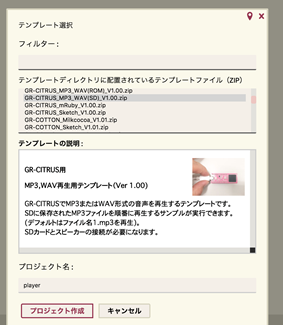
This template is used to create the project and generate the gr_sketch.cpp file. Using this file as your base, rewrite as follows:
#include
#include
#include
#include
#include

#define LED_ON		HIGH
#define LED_OFF		LOW

WavMp3p wavmp3p(44100);
File root;

static void touch_handler(void);

void setup()
{
	Serial.begin(115200);
    Serial3.begin(115200);

	pinMode(PIN_LED0, OUTPUT);
	digitalWrite(PIN_LED0, LED_ON);

	while(!SD.begin())
	{
		Serial.println("Card failed, or not present.");
		digitalWrite(PIN_LED0, LED_OFF);
		delay(1000);
		digitalWrite(PIN_LED0, LED_ON);
	}

	pinMode(SW_PAUSE, INPUT_PULLUP);
	pinMode(SW_SKIP, INPUT_PULLUP);

	MsTimer2::set(200, server_handler);
	MsTimer2::start();

	wavmp3p.play("S.MP3");
}

void loop() {
}

static void touch_handler() {
	static int tapSumFirstValues = 0;
	static float tapAvgValue = 0;
	static int TAP_COUNT_AVG = 10;
	static int tapFirstCounts = TAP_COUNT_AVG;
	static int tapTime = 0;
	static int tapCount = 0;
	static bool isTapped = false;

	if (tapFirstCounts > 0) {
		tapSumFirstValues +=  analogRead(A0);
		tapFirstCounts--;
		return;
	}
	if (tapFirstCounts == 0) {
		tapAvgValue = (float)tapSumFirstValues / TAP_COUNT_AVG;
		tapFirstCounts = -1;
	}
	Serial.println(tapAvgValue);
	int v = analogRead(A0);
	if (((float)v / tapAvgValue) < 1.0) {
		isTapped = true;

	} else if (isTapped) {
		tapCount++;
		isTapped = false;
		tapTime = 0;

	} else if (tapTime > 20) {
		switch (tapCount) {
		case 0:
			break;

		case 1:
		case 2:
		case 3:
		case 4:
			wavmp3p.play((String(tapCount) +  ".MP3").c_str());
			break;

		default:
			wavmp3p.play("S.MP3");
			break;

		}
		tapCount = 0;
		tapTime = 0;
	}

	tapTime++;
}
The point is to use the touch_handler function to detect if the gadget has been tapped and, if tapped, how many times, based on the value of pin A0, and then play the MP3 file accordingly.
The following tutorial provides instructions on how to write a sketch to GR-CITRUS: http://gadget.renesas.com/ja/product/citrus_sp2.html
After the sketch is successfully written to GR-CITRUS, you can play around with tapping the pressure sensor to produce and stop sounds for various uses.
Emitting sounds by remote control: mechanism
This is similar to the previous sample but shows you how to play sounds remotely using the ESP8266 module on WA-MIKAN.
Speaker: GR-CITRUS
WA-MIKAN (reads a tune from the SD card; ESP-8266 communicates with Wifi router)
How it works: Rewrite ESP8266 to operate as the Web server and access ESP8266 via a browser or app to specify the file you want to play. GR-CITRUS figures out which tune you want to play from the ESP8266 via serial communications, and starts playing it.
Emitting sounds by remote control: WA-MIKAN preparation
As a WA-MIKAN microcontroller, ESP-8266 comes with firmware, but in this example, we want to rewrite WA-MIKAN using Arduino IDE.
The following link provides instructions on rewriting WA-MIKAN: http://www.slideshare.net/MinaoYamamoto/wamikan
The specifics: Set the WA-MIKAN J1 to ON. On the end that that has a line of 6 pins (the end without the SD card slot), connect the USB-TTL serial conversion cable to the 3.3V, GND, RXD, and TXD pins. Use a USB-TTL serial conversion cable that outputs 3.3V.
Use Arduino IDE software to write to WA-MIKAN. Use Board Manager, an Arduino IDE feature, to prepare for the write operation to ESP8266.
(Photo: Writing to WA-MIKAN)
Start up Arduino IDE, open Preferences, and enter the following URL in the field labeled “Additional board manager URL”.
http://arduino.esp8266.com/stable/package_esp8266com_index.json
After entering the URL, select OK. Then from the Tool menu, select the menu that starts with Board, and from there select Board Manager.
The Board Manager dialog box will appear on the screen. Scroll down until you see “esp8266 by ESP8266 Community”. Select and install. After the board manager is installed, make sure it works properly by re-booting Arduino IDE.
Move the cursor to Board in the Tool menu. If you find Generic ESP8266 Module in the list, the board manager has been successfully installed. Select Generic ESP8266 Module.
Now you will actually write a program. From the File menu, select Sketch example à ESP8266WebServer à HelloServer.
First, rewrite the handleRoot function of the sample as shown here.
void handleRoot() {
  server.send(200,"text/plain","hello from wa-mikan!");

  for (uint8_t i=0; i

 By rewriting the handleRoot function, the request arguments received as a Web server will be sent to Serial. For example, if the browser sends the following request to ESP8266:
http://
Then ESP8266 sends the following string to Serial:
a: hoge
Based on this function, the ESP8266 will send file names of tunes you want to play to GR-CITUS.
Don’t forget to set the SSID and password. Make sure you change the setting section of lines 6 and 7 to the correct access point.
const char* ssid = ""; const char* password = " ";
Also, if we don’t know the IP address of the ESP8266 when it is connected to the access point, it won’t be able to access WA-MIKAN. Use the mDNS feature to name the IP address. Also, since the source code of HelloServer used in this sample supports mDNS, change the name to wa-mikan as shown below to make things easier.
(It’s located around the 54th line.)
  if (MDNS.begin(“wa-mikan")) {
    Serial.println("MDNS responder started");
  }
This enables the system to access the http://wa-mikan.local/ URL and eliminates the necessity to search for the IP address.
Use Arduino IDE to write the above changes to WA-MIKAN.
Emitting sounds by remote control: implementation
We are almost done! You have completed the setup on the WA-MIKAN side, so the final step is to write the sketch to GR-CITRUS. As you did with the pressure sensor, use the Web compiler to write the following program.
#include#include #include #include #include #define LED_ON HIGH #define LED_OFF LOW WavMp3p wavmp3p(44100); File root; static void server_handler(void); void setup() { Serial.begin(115200); Serial3.begin(115200); pinMode(PIN_LED0, OUTPUT); digitalWrite(PIN_LED0, LED_ON); while(!SD.begin()) { Serial.println("Card failed, or not present."); digitalWrite(PIN_LED0, LED_OFF); delay(1000); digitalWrite(PIN_LED0, LED_ON); } pinMode(SW_PAUSE, INPUT_PULLUP); pinMode(SW_SKIP, INPUT_PULLUP); MsTimer2::set(200, server_handler); MsTimer2::start(); wavmp3p.play("S.MP3"); } void loop() { } static void server_handler() { String readString = ""; if (Serial3.available()) { while (Serial3.available()) { delay(1); char c = Serial3.read(); readString += c; } Serial.println(readString); if (readString.startsWith("s: ")) { String soundFile = readString.substring(3); soundFile.remove(soundFile.length() - 2); // trim newline Serial.println("play: " + soundFile); wavmp3p.play(soundFile.c_str()); } else { Serial.println("not mutch command"); } } }
The code shown the above is shorter than the version for the pressure sensor. But the feature has been upgraded, so that music files can be played via WiFi. This is the power of the ESP8266 on WA-MIKAN!
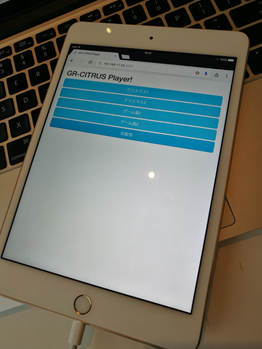
Let's play music!
At this point, both GR-CITRUS and WA-MIKAN are ready to go, but you need to set up the window for the browser where you select the tune to be played. Upload the HTML file to one of the Web servers and access via your PC, tablet or smartphone. Press the corresponding button for HTML display.
(Normally, ESP8266 operates as the Web server, so you should be placing an HTML file on the server. I leave this task as a challenge to the readers of this article. Consider it the next step toward perfecting your gadget!)
/edDir/files/citrus_player_sample.html
The data-id attribute section of the button tag in the HTML plays the tunes saved in the SD card when the button is pressed. Feel free to replace the files saved in the SD card with your own preferences.
If you are working in a Mac environment, note that Python must be included as default. Type in the command shown below in the terminal window, then the Python Web server starts running. Save in the same directory as that of the previously indicated HTML file.
Enter “http://
% python -m SimpleHTTPServer
The founder of Nyanpas Inc., organizing core working space HaLake, study meeting for IOT as well as programming.

Follow