
Title:Let's try the function on GR-KURUMI, Wifi vol.
Displayed Name:@chobichan

| Concept / Overview |
|---|
| Using the function on GR-KURUMI, Wifi vol. |
Wi-Fi with GR-KURUMI
Let’s connect GR-KURUMI with XBee wifi.
As for interface with XBee wifi, we can choose serial or SPI, choose serial this time.
Also we can choose Serial or Serial1 for interface with GR-KURUMI, choose serial1 this time.
When XBee wifi wired- connect with outer device such as micro controller, we can choose the data exchange method among two, API mode which convert the data by flaming or trans-parent mode without flaming. Being user friendly, choose transparent mode for sample application.
Let’s work out internet radio wifi version.
※For more information about Xbee, Please refer to below.
http://www.cqpub.co.jp/hanbai/books/48/48241.htm
Or abstract from the magazine, transistor technology.
http://toragi.cqpub.co.jp/Portals/0/backnumber/2012/04/p144.pdf
Or manufacturer site.
http://www.digi.com/products/xbee-rf-solutions/modules/xbee-wi-fi
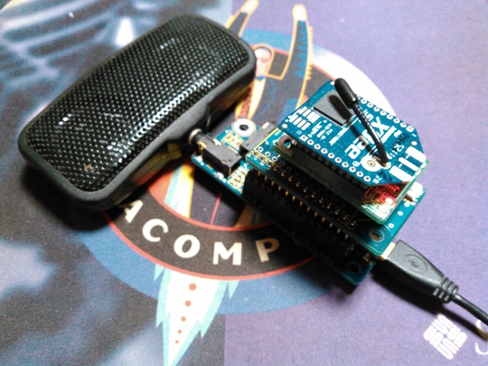
Connection with GR-KURUMI
Use WalSound (board for SD card) to play music.
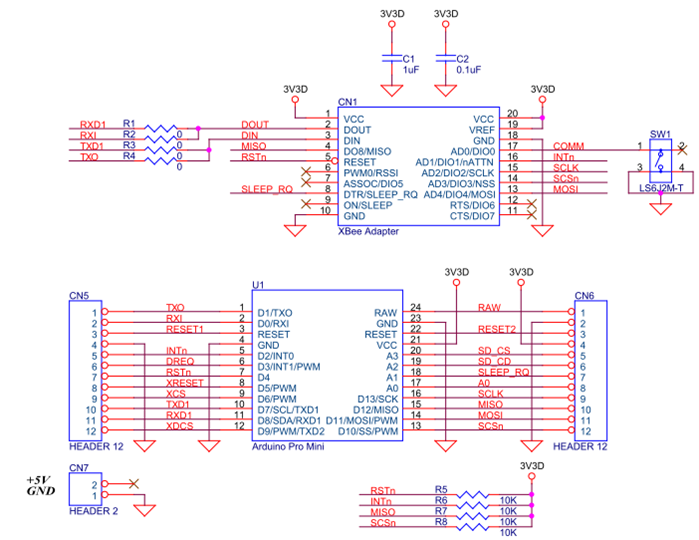
Please refer to the schematics for the connection with XBee wifi, we won’t use the wiring relative to SPI. Use TXD1, RXD1, Reset signal RSTn.
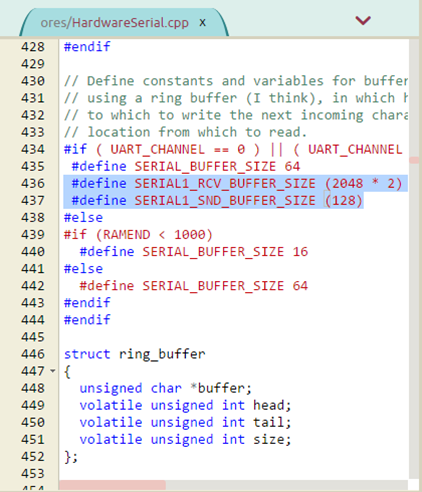
Increment the size of receiving buffer
Suppose that music data is coming from radio distribution sever on internet at various intervals, irregularly.
Standard size for receiving buffer is 64byte on GR-KURUMI, it’s not enough, let’s increase buffer size on Serial 1.
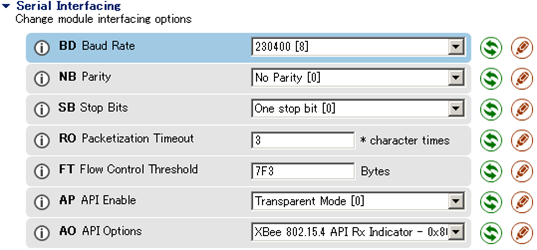
Setting XBee Wi-Fi on transparent mode
For transparent mode operation, write the destination information into WBee wifi in advance.
The destination information means the protocol type of TCP/UDP, IP address or port number.
Using X-CTU, write these information into XBee wifi.
Details is as follows.※Please take notice of the items in the blue lines, to be changed from the default.
IP:Choose TCP.
TM:Turn around time to time out on client operation. “32” is equivalent with 50 in decimal notation. That means time out will be in 5000ms.
DO:Fill in 0 for device option.
NS:Obtained automatically when DHCP is executed.
DL:IP address for music server, the value was obtained from the PLS file. Please refer to the Ethernet vol.
DE:The port number of music server, to be filled in 1F4F in hexadecimal notation instead of 8015 mistaken.
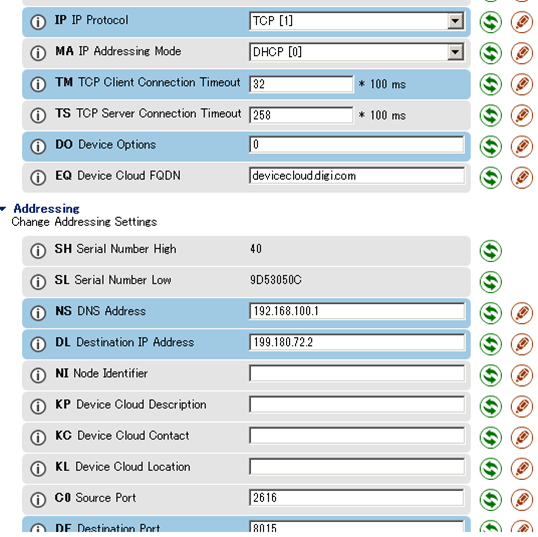
BD:Baud Rate is 230400bps.
AP:Choose transparent mode (in white line).
【The essential points on programming】
Executed serial connection with XBee wifi. Unlike the Ethernet, serial is the character device, can’t proceed the data by block.
Once receiving the data by 1bit, serial send the data by 1byte to MP3 decoder IC.
Please refer to the reference code.
Differing from the Ethernet, data receiving speed is not so high on XBee wifi.
The bit rate which we mightn’t care the intermissions is 32kbps.
Hope that it will be improved.
It’s extremely good that we can listen to internet radio everywhere in the house unlike the wire communication.
unsigned short port;  //server port
const char *fn;
int rate;  //bit rate
//const char *type;  //mp3 or aac
} station[] =
{
//  {"TheJazzGroove.com","199.180.72.2",8015,"/",128},  //port=0x1f4f
//  {"SmoothJazz.com Global Radio","75.126.221.202",8000,"/",128},  //port=0x1f40
//  {"SmoothJazz.com Global Radio","173.244.199.250",80,"/",64},  //port=0x50
//  {"JAZZ.FM91","209.159.189.54",8002,"/",32},  //port=0x1f42
{"SmoothJazz.com Global Radio","173.244.199.251",80,"/",32},  //port=0x50
};
int stationNumber = 0;

//Ethernet編と同一で省略

void setup()
{
  Serial.begin(230400UL);
  Serial.println("XBee wifi test.");

  SPI.begin();
  SPI.setClockDivider(SPI_CLOCK_DIV8);  //2mhz
  SPI.setDataMode(SPI_MODE0);
  vs1011eInit();
  setVolum( 0x2020 );  //上位と下位に分かれている。数字が大きくなると音が小さくなる。
  //SPI.setClockDivider(SPI_CLOCK_DIV2);  //8mhz

  xbee.begin(230400UL);
  pinMode( RSTn, OUTPUT );  //xbee wifi hardware reset
  digitalWrite( RSTn, LOW );
  delay( 10UL );
  digitalWrite( RSTn, HIGH );
  delay(15 * 1000UL);
  Serial.print("connect to ");
  Serial.println(station[stationNumber].domain);

  while( true )
  {
    Serial.print(station[stationNumber].name);
    Serial.println(" connected.");
    // Make a HTTP request:
    String str = "GET ";
    str += station[stationNumber].fn;
    str += " HTTP/1.1\r\n";
    str += "Host: ";
    str += station[stationNumber].domain;
    str += "\r\n";
    str += "Accept: */*\r\n";
    str += "User-Agent: GR-KURUMI\r\n";
    str += "Connection: Close\r\n\r\n";
    xbee.print( str );
    Serial.print( str );

    unsigned long lastTime = millis();
    #define  TIMEOUT  5000UL
    #define  RCV_BUFFER_LIMIT  2048
    int rcvSz;
    byte *mp3Data;
    while( true )
    {
    rcvSz = xbee.available();
      if(rcvSz > 0)
      {
        /*XDCSのアサート*/
        VS_XDCS_IS_0;
          while( rcvSz )
          {
            unsigned char c = xbee.read();
            rcvSz--;
            /*書き込めるまで待ちを入れる*/
            while( VS_DRQ == false ) rot_rdq();
            /*データの書き込み*/
            SPI.transfer( c );
          }
        /*XDCSのネゲート*/
        VS_XDCS_IS_1;

        lastTime = millis();
      }
      else
      {
        if( (millis() - lastTime) > TIMEOUT )
        {
          Serial.println("TIMEOUT!");
          if( ++stationNumber >= (sizeof(station) / sizeof(station[0])) )
          stationNumber = 0;
          break;
        }
      }
    }
  }
}

void loop()
{
}
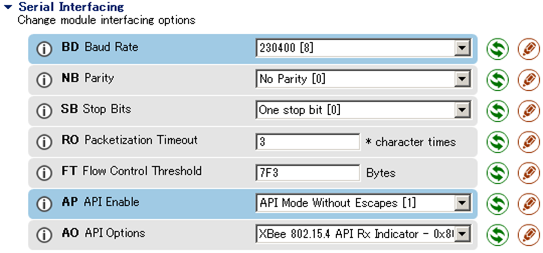
Setting XBee Wi-Fi on API mode
Transparent mode execute 1 on 1 communication with destination. Requiring to set the items on TCP/IP in advance, we are forced to minimize the utility of programing on the microcontrollers. It’d be restrictive, less flexibility.
If you’d like to take advantage of various kinds of service on internet, I recommend API mode.
Connecting with NTP server, let’s work out internet clock.
With X-CTU, fill in XBee wifi with these information.
Details is as follows. ※Please take notice of the items in the blue lines, to be changed from the default.
Unlike the transparent mode, API mode reduce entry items requiring to be changed since necessary matters are to be set with API flame.
DO:Set at 0 for device options.

As for the items for network , use the information obtained by DHCP as it is.
Use the defaults for IP address and port number of destination.
Please don’t forget that API mode is to be selected for the items on AP.
【The essential points on programming】
1.Checking the current status of XBee wifi
The first of all, with API mode, check the current status of XBee wifi.
It take some time for XBee wifi to start from RESET status, connect the access point and participant in network.
The program on transparent mode spend the waiting time caused by delay for that.
XBee wifi inform the change of the status with API flame when it starts or participating in network. On the other side, API flame allow microcontroller to check the status.
Please refer to the modem status on the items on API in the manual for XBee wifi.
The response codes from XBee wifi are
O means start
1 means that reset happens by Watch Dog timer
2 means participation in network
3 means the release of the connection from access point.
Waiting for code 2 sending from XBee wifi. ※Using AT command, we can check the current status from microcontroller side.
Checking the current status is always required, unless the Xbee wifi participates in network, we are not allowed to use it.
2.Acquiring the global IP address from domain name with DNS
On working out the internet clock, it's mandatory to know the present time somehow, access to NTP server on internet.
NICT is one of the most popular NTP servers in Japan.
The domain name of the NTP server is ntp.nict.jp.
XBee wifi doesn’t have the name resolution function by DNS, users have to resolve it by themselves.
In other words, execute name resolution by DNS before access to the NTP server.General speaking, once obtain the network information with DHCP function, acquired the address of the DNS server, this is the item on NS.
With AT command on API, acquire the present value of NS through Xbee wifi, ask DNS to resolve name against the IP address.
3.Acquiring the present time from NTP server
After acquisition of the IP address of NTP server by DNS, let’s obtain the present time from server with NTP protocol.
Referring to RFC1305 or RFC2030 specifying the NTP protocol, see the packet structure in the chart.

For simplicity’s sake, assumed the transmission time of the server (transmission time stamp) to be present time, though originally we should calculate the four 64bit fixed point time data in NTP protocol such as the present time, transmission time, receiving/transmission time by server side, to obtain the high-precision time. ※
This packet structure is the common between both sides of requiring and corresponding service to NTP.
If we send out the packet with suitable data, we can obtain the feedback from NTP server.
※ To obtain the high-precision time, originally we should calculate four times considering internal delay time, network delay time, server internal processing time.
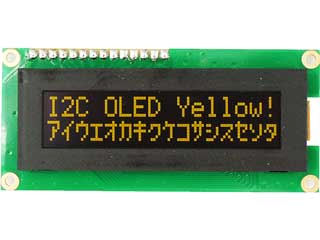
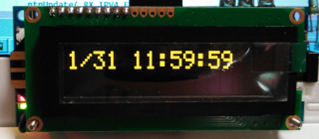
4.Indication of time
Use character type pf OLED display, placing in Akizuki on sale.
http://akizukidenshi.com/catalog/g/gP-08278/
Comparing LED, it’s much improved in contrast, visibility regardless of distance or brightness.
Comparing LED, it’s much improved in contrast, visibility regardless of distance or brightness.
Here, display the time obtained from NTP.
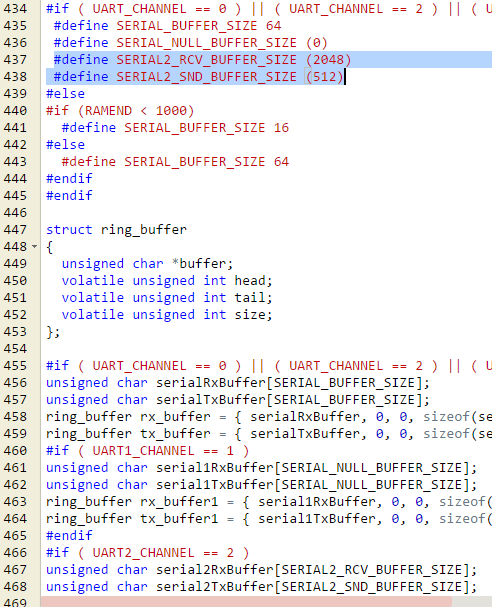
Size enhancement of receiving/sending buffer
Asking DNS or NTP service, up to 512byte of packet size is required at one time. The serial which connect with Xbee wifi is Serial 2 this time.
Open HarwareSerial.cpp to increase the size of receiving/sending buffer in line with packet size.
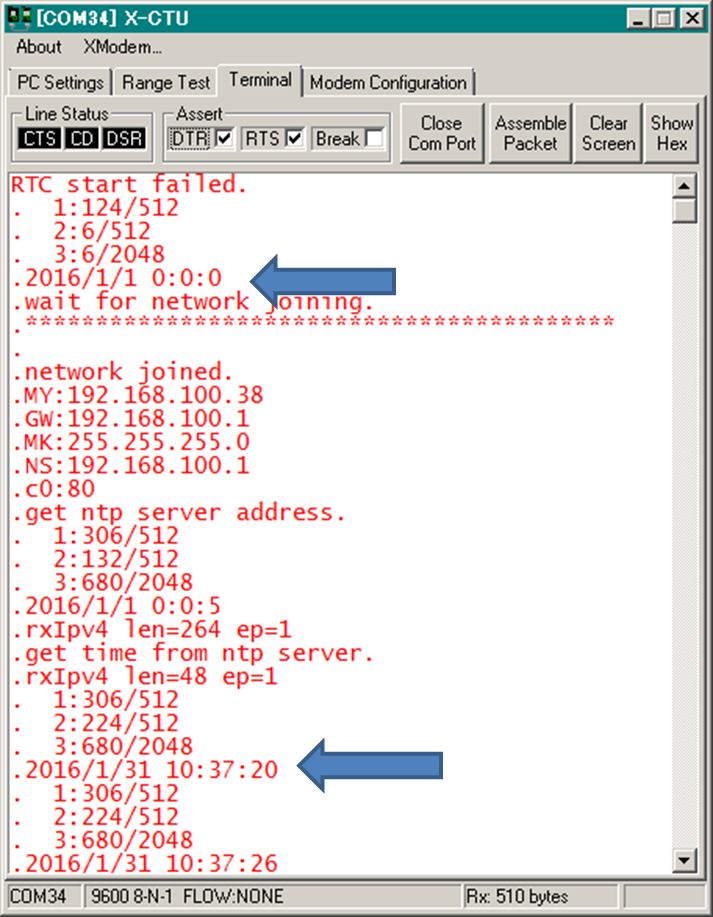
【Execution result】
Code size of program is too big to post in this page.
Please refer to the chart for execution result and notice the time marked with arrows.
At the first arrow, it shows the standard date of 2016.1.1 immediately after starting. At the 2nd arrow. It turned out the present date. OLED display shows the present date and time.
General hard engineer...occasionally writing for technical magazine.
twitter account:
https://twitter.com/chobichan

Follow