
Title:Introduction of GR-KURUMI
Displayed Name:@chobichan
| Concept / Overview |
|---|
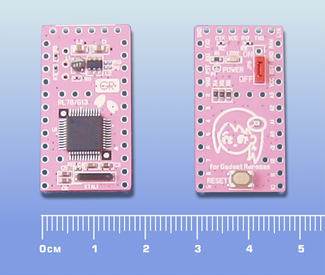
| 【About GR-KURUMI】 Small size MCU board released by GADGET RENESAS project, designed for compatible with Arduino Pro Mini on board configuration, pin arrangement, library. Core is 16bit MCU, named RL78/G13 on board. Now on sale by Wakamatsu Tsusyo. http://www.wakamatsu-net.com/cgibin/biz/pageshousai.cgi?code=38320035&CATE=3832 It costs 2,200yen. Buy or get in the events such as seminars, presentation sessions which GADGET RENESAS plan on a regular basis. You can check the event information as below. http://gadget.renesas.com/en/index.html As for the GADGET RENESAS boards information including GR-KURUMI, please get access to the GADGET RENESAS community site. Find something you want. http://japan.renesasrulz.com/gr_user_forum_japanese/default.aspx |
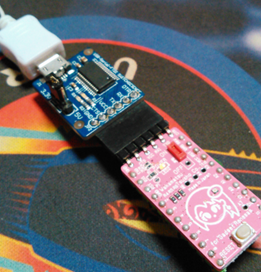
Preparations in advance for writing programs (hardware)
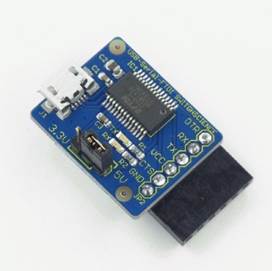
Use USB serial adaptor for writing programs into GR-KURUMI.
http://www.amazon.co.jp/dp/B009AME9R4/
The adaptor in the picture include FTDI/FT232RL as chip, however, basically it’s writable with any chip if it has control line.For your reference, used Silicon Labs/CP2104 in my case.
Be careful with fakes for FT232RL, distributed in the market.
http://www.amazon.co.jp/dp/B00KS12RIO/
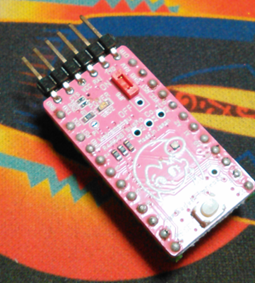
For easier removing and inserting of breadboard necessary to operate GR-KURUMI, solder pin header in single line through holes on longer side on GR-KURUMI. Narrow type of pin header (on sale by Akizuki) is helpful.
http://akizukidenshi.com/catalog/g/gC-04397/
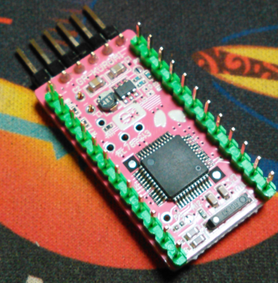
For connecting adaptor with GR-KURUMI, solder pin header through holes for 6 pins on shorter side on GR-KURUMI.
http://akizukidenshi.com/catalog/g/gC-05336/
Preparation has been done for writing programs.
Benefit from GR-KURUMI

GR-KURUMI is (almost) compatible with Arduino Pro Mini (which costs \1,243 in Amazon.com).What brings you to choose more expensive GR-KURUMI?
Don’t hesitate to take if you would like to evaluate GR-KURUMI for RL78/G13.
Since almost all RL78/G13 terminals, R5F100GJAFB 48pin LQFP type, are available on board, it will help your development.
However, what brings users to GR-KURUMI who make electronic kit for their recreation?
In my opinions, using it for a long time, the advantage of GR-KLURUMI is its development environment with rich resources.
This is a comparison chart between Arduino Pro Mini and GR-KURUMI.
※ Can operate from 0.8V since booster circuit is mounted on board.
※ e2studio, development environment local use only based on eclipse, debagger (E1) is available.
※ IDE for GR allows web compiler environment to be in use locally.
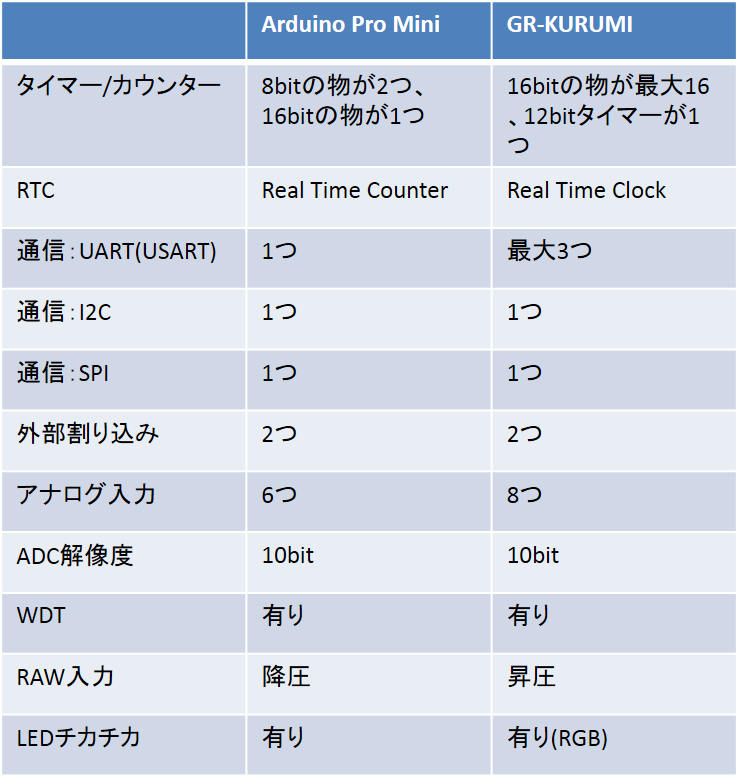
Chart shows comparison on functions between Arduino Pro Mini and GR-KURUMI while they are operating under standard library.
For example, both have more terminals for an interrupt. Also, RL78/G13 has digital comparator while Atmega328P has analog one.
Moreover, RL78/G13 has DMAC so that you can transfer the data which was absorbed through ADC to the memory without mediation of CPU. ADC of RL78/G13 has a function of taking in all of multiple analog input at once.
GR-KURUMI has an advantage on its memory size.
256Kbyte of Flash ROM is enough to show Japanese language font though resolution is low.
No problem to mount RTOS with 20Kbite of SRAM.
Regarding serial communication using UART, GR-KURUMI can reduce much burden of CPU since its hardware serial can be used up to three channels, while in Arduino Pro Mini case, soft serial to be used for more than two channels.
The terminals of GR-KURUMI with port numbers

The chart shows standard pin map on GR-KURUMI.Can handle terminals with numbers of 0~13 (digital), A0~A7 (analog/digital) as well as Arduino Pro Mini.
Each number is compatible with Arduino Pro Mini's one,it's easy to transfer the sketch which was generated with Arduino Pro Mini to GR-KURUMI. Waveform can analogwrite PWM output up to 6 which is supported by library,“Serial” stands for “UART”, the input/output direction marked by arrows. “Wire” means “I2C”,the mark like clock signal stand for “SCL”,the interactive arrows show the data (SDA).
For SPI portion, from above in the map, Clock (SCK), Input (MISO), Output(MOSI), slave select(SS).
Slave select, can connect several SPI device since other terminals can be applied for. The mark Similar to diode stand for reset input outside. Black "_" mark for GND. Regarding “+” mark, connect orange one (RAW) when using power supply less than 3.3V such as a dry cell. On the other hand, connect red one(VCC) when using 3.3V power supply generated outside, or providing 3.3V outside generated by boosting RAW input.The terminal in line on top of the map is used for writing programs or connecting for debagger.
Try web compiler
GR-KURUM has three development tools, WEB compiler, e2studio, IDE for GR. Let us explain about web compiler first which is user friendly.
Web compiler is development environment on cloud, you can use it on browser without installing software into your PC, on the other side, you can’t use debagger for debagging. When you'd like to use debagger, use e2studio.
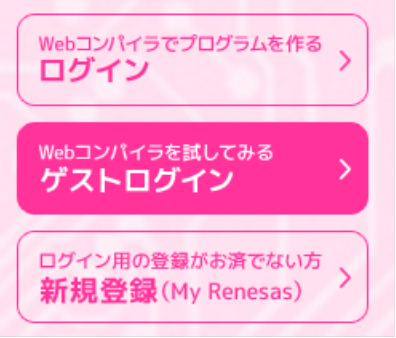
Go to GADGET RENESAS home page, and click 「Guest Login」on the right in the screen.
http://gadget.renesas.com/en/index.html
Go through a notice with your agreement, otherwise you can do nothing about GR-KURUMI.
Once web compiler open, specify the template in dialog box. Select V1.12 for GR-KURUMI standard project this time, give a project name, click 「project work out」.
※ The menu number V1,12 is subject to change when development environment or library is updated.
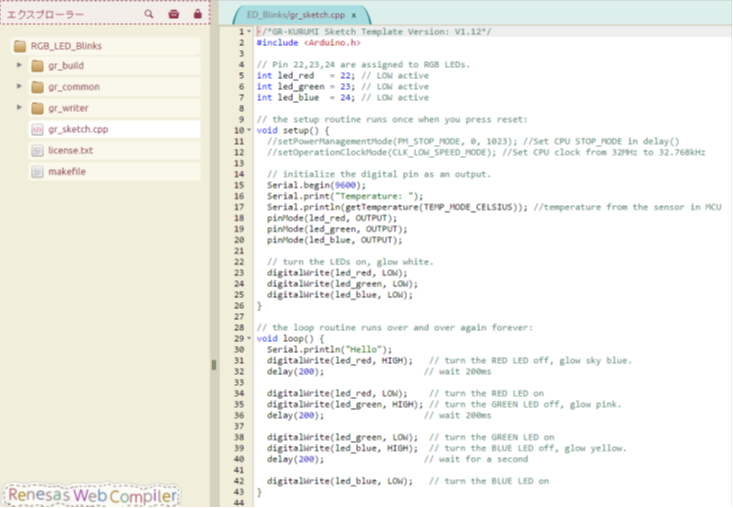
Double click「gr_schetch.cpp」on the upper left in the screen on web compiler, the source file「gr_schetch.cpp」will open.Work out programming by compiling this.
The program in GADGET RENESAS has 「CPP」 extension as source of C++, while Arduino has「ino」.
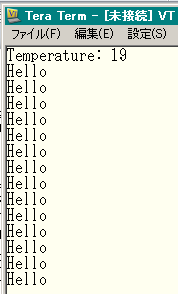
This program let the word “Hello” display continuously and emit RGB LED on board, after the program take in the value on the temperature sensor built in CPU and output it with serial.

Click 「building execution」 on the right in the screen on web compiler, start to compile existing program on cloud server. Please note that It’ll take some time for the first compilation.
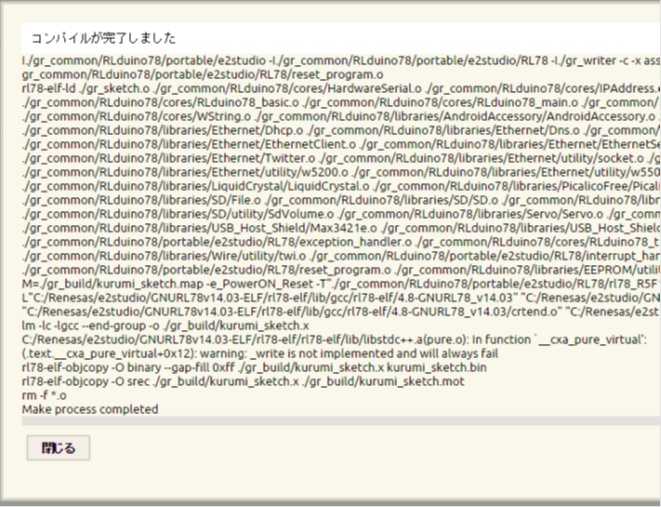
On the screen, if you will see the message with 「Make process completed」 at the end, it will be OK.If you have problems on program, you will see the description about error. Click 「building execution」again after you compile source file to modify.
Writing Programs (software)
Move to writing programs after compilation has been successfully done on web compiler.
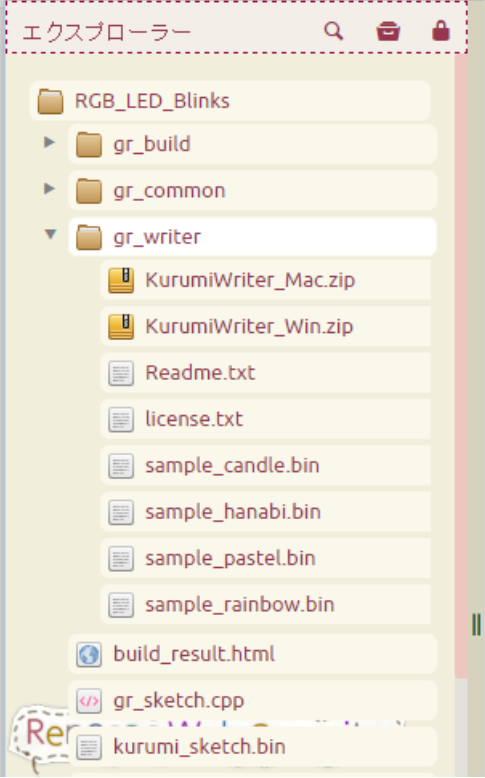
Move to writing programs after compilation has been successfully done on web compiler.Please see “preparation in advance” for hardware preparation. Download software here, double click「gr_writer」folder on the left in the screen.Each Zip file is ready for windows, Mac. Right-click on a ZIP file for download and release in suitable folder.
Select 3.3V if USB serial adaptor has power supply switch.
Connect adaptor with GR-KURUMI.
Connect adaptor and PC with USB cable.If PC doesn’t have a driver, install a driver first.
In 「explore」 on the left in the screen,「kurumi_shetch.bin」is a binary file of the program which you have generated not long ago.
Right-click on this file for download, release is unnecessary this time.
Starting this software after PC recognize it as serial port.
Select an appropriate port for downloaded 「kurumi_shetch.bin」
Tick on「Run after COM open」to let program start when COM port open with terminal soft.
Push 「write」 button for writing program, using 「Tera term」 this time.
Start「Tera term」 to open COM port.
If you see the temperature as well as the word 「Hello」 display, LED emit on board, that will be OK.
Register to save the programs
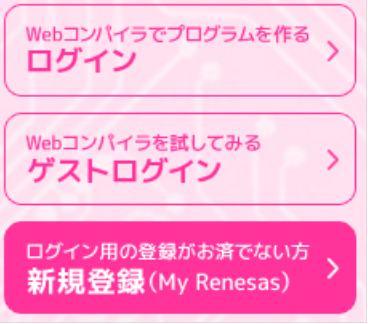
The program generated with web compiler through 「guest login」has not been saved, since it’s for trial use only. To save the program, need to execute 「user registration」.
Click「New Register」,「Register now」to complete the form.
Click 「Login」 to open web compiler through the same procedure as「Guest Login」.
The area size is 100Mbyte available for user development on cloud server. ※It's unlikely changed.
Please note that It doesn’t seem to be enough to save program since all interim files should be included.When you fail to compile programs with web compiler, possibly you have reached this limitation of 100Mbite.
To avoid such situation, you have to make room by transferring unnecessary files to your own PC.
Helpful information to develp GR-KURUMI
See the helpful information to develop GR-KURUMI.
This is the information peculiar to a library.
KURUMI sketch reference
http://tool-cloud2.renesas.com/Renesas/ref_kurumi/gr_reference_j.html
This is not inclouding language spec.
For language information, please go to the homepage of Arduino.
Language Reference
https://www.arduino.cc/en/Reference/HomePage
For Ethernet information, please see below.
Libraries
https://www.arduino.cc/en/Reference/Libraries
When you are keen on something not included in library,
need to know more about RL78/G13 (hardware), please go to Renesas Electronics home page. For example, automatize sampling using timer and DMAC.
http://japan.renesas.com/products/mpumcu/rl78/rl78g1x/rl78g13/Documentation.jsp
Join the community to seek answer for your question.
Renesas Rulz
http://japan.renesasrulz.com
Gadget Renesas Homepage
http://japan.renesasrulz.com/gr_user_forum_japanese/default.aspx
General hard engineer, occasionally writing for technical magazine ...

Follow