
Title:Mushroom Cultivation Gadget
Displayed Name:Fumiya KUME
| Concept / Overview |
|---|
| My name Fumiya Kume, and I was born in 1998, the year that produced Windows 98. Incidentally, the first computer I even touched was a Windows 8! I began programming in my first year of high school, and have been at it now for 3 years. I have not only participated in IT study groups in Nagoya and Tokyo to absorb new technology, I also present what I have learned in Lightning Talks (with 5-minute limits). I have developed Windows store and iOS applications, as well as Chrome Extensions and the like, which are available in these stores. IoT has been talked about a lot recently, spurring my interest in hobby electronics. As my internship project at Shaxware, Inc, a company started late last year, I tried to create a gadget using GR-PEACH. I quickly decided on Assisting Plant Cultivation! as the title of my gadget project. However, settling on which plant to cultivate was a real headache. Radishes and their sprouts are famously easy to grow, but I ultimately chose one of my very favorites: mushrooms. I thought they sounded easy, since getting them started, and sustaining cultivation, only required water apart from temperature and humidity regulation. There are many varieties of mushrooms—shiitake, nameko, king trumpet mushrooms, brown beech mushrooms, oyster mushrooms, hen-of-the-woods mushrooms, and more. Since I was creating my gadget from winter to spring, I decided on shiitake, which are in season during spring and autumn. The store from which I bought the shiitake ships the mushrooms once they have completed early-stage development, which was reassuring for a beginner like me. When I researched shiitake cultivation, I learned that maintaining a temperature between 10 and 25 degrees, and a humidity level between 65 and 70%, is key. Since I’m a worrywart, I wanted not only to be able to see the temperature and humidity, but to be informed immediately if either figure slipped out of suitable range. I also thought it would be interesting to have the mushroom growing conditions photographed. I affixed a web camera as well as a temperature and humidity sensor, thus creating a gadget that integrates a web service. |
Schematics and required components
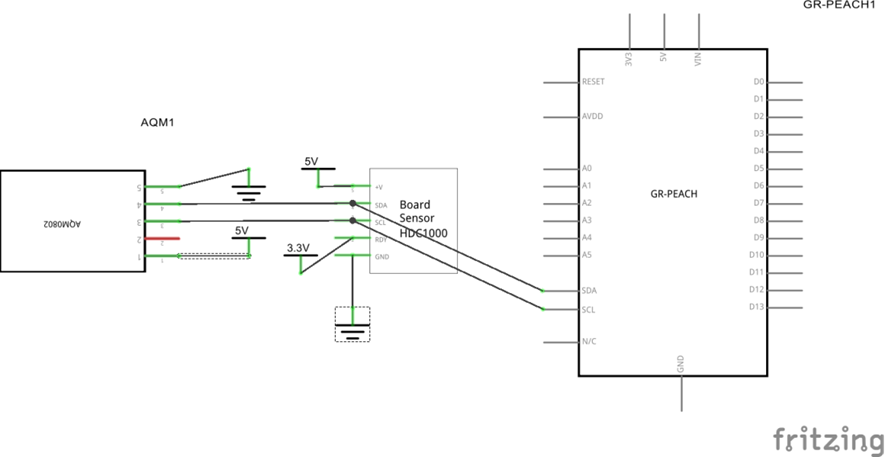
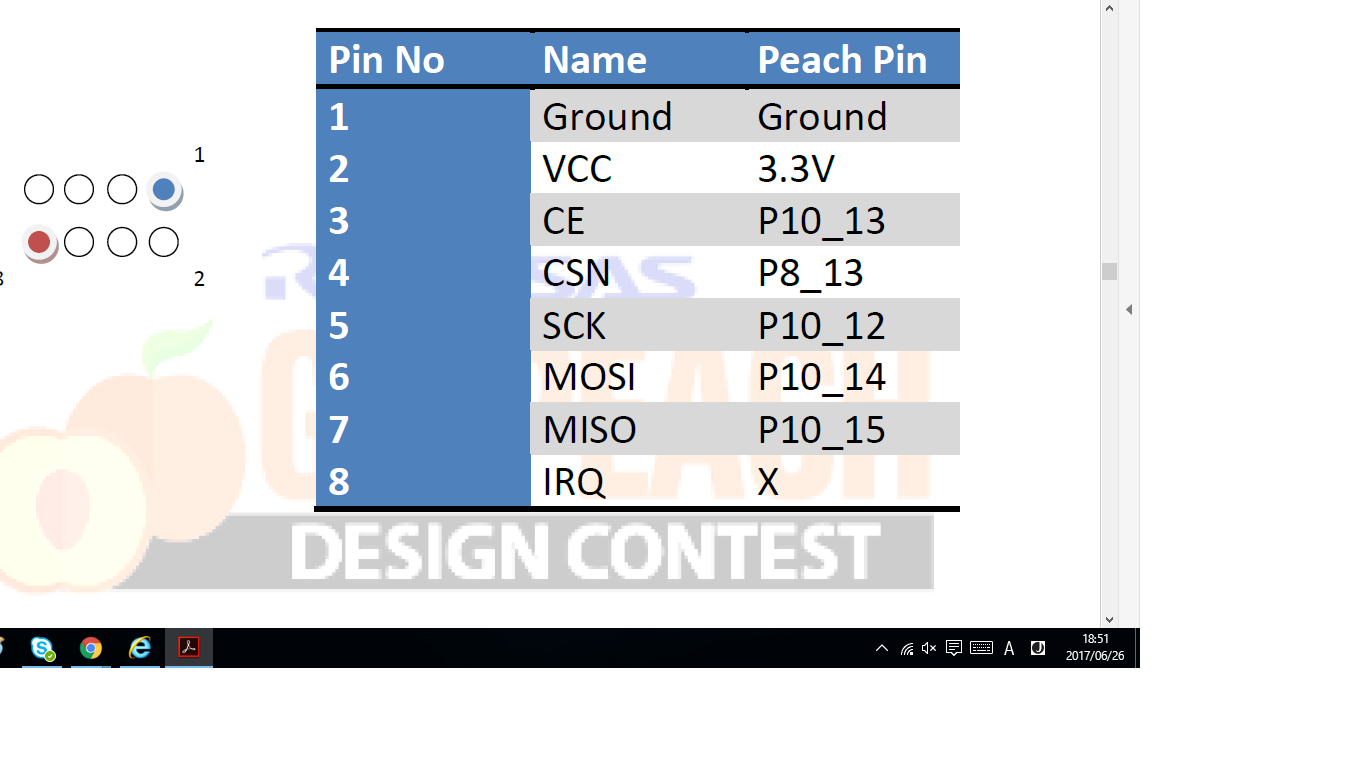
Since plenty of libraries and samples are available, I chose an HDC1000 as my temperature/humidity sensor, and an AQM802 for the LCD, using I2C protocol for communication and controls for both. At first, I also searched for a product enabling I2C connection for the camera too, but when I considered installation flexibility for photographing mushrooms, I ended up selecting a webcam with a USB connection. Using the USB connection also meant I would not have to take circuit design into account. There are so many webcams on the market, but I decided on the LOGICOOL C270 as it has a great track record with GR-PEACH. The components I used for my gadget are listed in Appendix 1. The following is the circuit I designed using these components.
◆ HDC1000 preparation
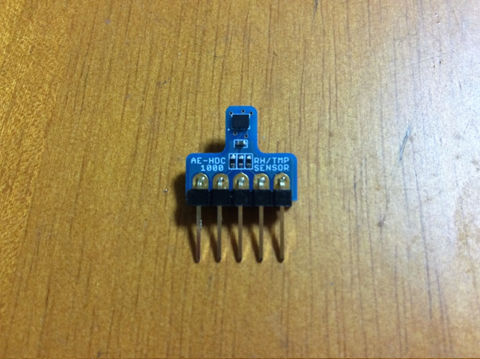
I identified and set aside the pin headers included in the HDC1000 kit. I inserted the pins into the holes of the pitch conversion board, soldering them in place. Since this board has a built-in pull-up resistor, the pins could be inserted as is.
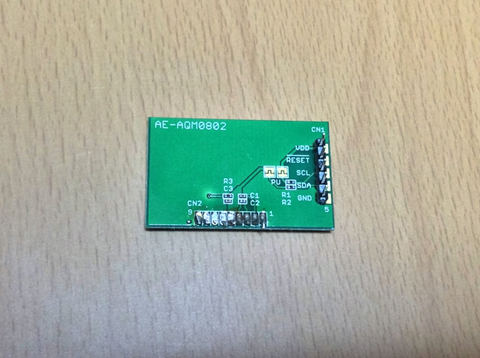
◆ AQM0802 preparation
Since the AQM0802 cannot be inserted into the breadboard as is, I utilized a pitch converter kit. I inserted the LCD pins into the 9 holes on the pitch converter kit, and soldered them into place. Next, I took the pin header included with the AQM0802, cut off a 5-pin block and inserted it into the 5 holes on the pitch converter board on the side that says CN1, soldering them into place.

◆ Processing JP3 on GR-PEACH
For the USB camera to function, the MCU board has to operate as the USB host. On GR-PEACH, the on-board USB1 on the GR-PEACH is enabled as the USB host by shorting JP3. Simply soldering the jumper would have worked, but instead, I used the pin header and jumper pin for easy enabling/disabling of the USB host function.
JP3 is located in the center of the GR-PEACH board. Insert the 2.4mm pin header and solder into place. If you grasp the pin header with the tip of a clip, soldering it to the GR-PEACH is much easier. Masking tape or something similar might be helpful to temporarily hold the pin header in place.
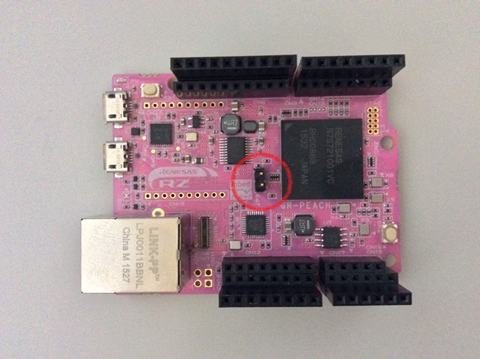
The photo shows the process of attaching the pin header.
To use USB1 for the USB host function, insert the jumper pin as shown in the photo.
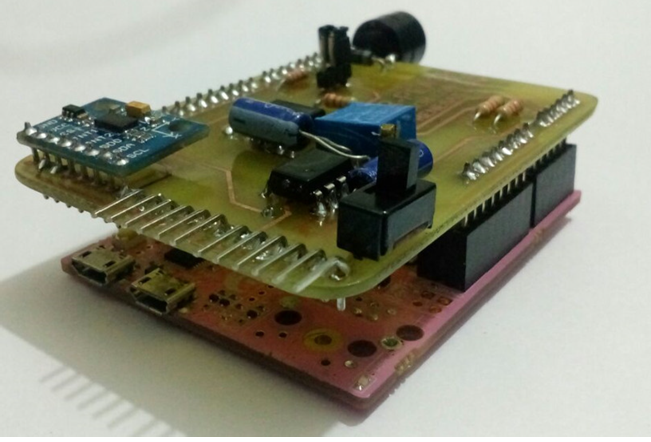
◆ Attaching the breadboard to the GR-PEACH
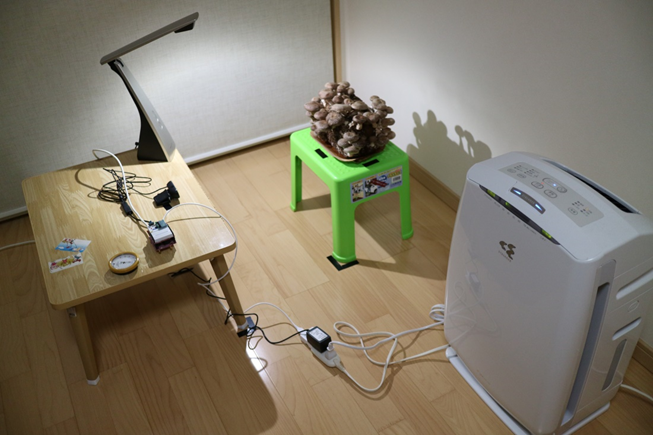
Mushroom cultivation takes numerous days. In order to avoid touching and destroying the project during that time, I thought it necessary to avoid use of jumper wires, etc. and keep the gadget as compact as possible. That spurred the idea of using a breadboard for stratification. More specifically, I inserted pin sockets for Arduino shields into the GR-PEACH, which is pin-compatible with Arduino. Since Arduino shield pins are a little long, they need to be cut to the right size. After installing the first pin socket, mount the Arduino vanilla shield and install the second pin socket. Then remove the protective strip covering the two-sided tape on the bottom of the breadboard, and attach the breadboard on top of the vanilla shield.
Place the prepared the HDC1000 and the AQM0802 on the breadboard and assemble the circuit as shown in the photograph.
To connect the webcam to my computer as planned, I needed to use USB Type-A. Since GR-PEACH only comes with Micro USB, I used an OTG cable to connect the webcam.
Programming
Here is the program flow: 1) temperature and humidity readings obtained by the HDC1000 are displayed on the LCD (AQM0802), 2) if temperature or humidity levels unfavorable to the mushrooms persisted beyond a specified time period, a warning is issued via a web service, 3) further notification is issued once temperature and/or humidity levels returned to appropriate levels, and 4) photographs are stored on the web service to monitor progress of mushroom cultivation. I considered using e-mail for notifications and photographs, but as I wanted to share photos of the mushrooms with my friends, I ultimately opted for Twitter. The GR-PEACH has two development and execution environments: mbed and .NET Micro Framework. I chose the former this time. As this was my first venture into the world of C++ programming, I learned quite a bit.
◆ Development and execution
I thought it was amazing that a browser is all you need to develop easily from anywhere with the mbed compiler, the cloud development environment offered by ARM. If you compile and link with the mbed compiler, you can download binary files. If you connect your GR-PEACH to your computer, the GR-PEACH appears as the drive (*), and you can copy and paste your downloaded binary file into it. That enables you to activate your program by pressing the reset button located beside the GR-PEACH USB port.
* Previous installation of a driver is necessary.
◆ Importing and debugging
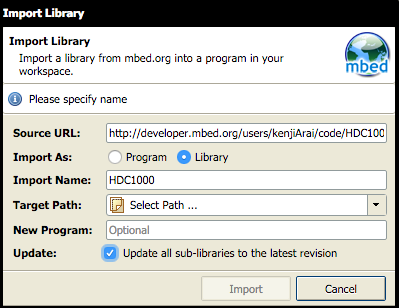
A wide variety of samples and libraries are available at the mbed site. Simply clicking on “Import” on the sample pages allows you to try them out. The libraries used in this program are listed in Appendix 2. If you select “update all sub-libraries to latest revision” when importing a library, as shown in the screen shot below, you may risk conflict if you are using multiple libraries. When I started this development project, I had to deal with conflict because I didn’t remove the check from “update all sub-libraries to latest revision” before importing.
mbed compiler is a good product and easy to use, but does not allow for debugging. Therefore, you have to use the printf function to output the necessary data while programming, and then debug while confirming with TeraTerm or similar terminal software. Also, to start a new paragraph, it is necessary to output "¥r¥n" and not "¥n.” Lastly, the GR-PEACH is apparently not recognized when certain cables are used.
◆ Posting on Twitter
As my gadget program is extremely simple, I don’t really need to explain it here. Instead, I would like to outline the pains I took trying to post on Twitter. I initially considered using IFTTT to post to Twitter but I soon learned that IFTTT doesn’t support images. I then thought about posting directly on Twitter. As of January 14, 2014, Twitter specifications have changed and now all API postings require HTTPS (SSL/TLS), but the standard HTTPClient does not support HTTPS. I also found out that HTTPSClient libraries offered by wolfSSL are usable, but most surveys/developments are in OAuth, JSON and the like, and regretfully gave up as I had run out of time. Instead, I developed the proxy with ASP.NET 4.6 + C#, which allowed me to post on Twitter using HTTP. I developed a Twitter proxy on my own, but as there are many such proxies out there, it would be fine to use one of them.
As there were many other fascinating factors about this project, I would like to comment on a few. HTTPClient can only support a 32-byte URL path, and the program wouldn’t run with a longer path. I could have rewritten the HTTPClient, but I shortened my Twitter proxy path to solve the problem. Another problem is that the standard HTTPClient fails to complete transmission when sending large amounts of data. This issue can be overcome by temporarily changing data to chunk size (CHUNK_SIZE). Additionally, the stack size of the main thread is too small, a problem I overcame by increasing the value of the OS_MAINSTKSIZE defined in mbed-rtos.
Mushroom cultivation
Mushrooms require water replenishment several times daily with an atomizer, and must be kept in a cool spot away from direct sunlight. If temperature and humidity are not regulated, cultivation will not proceed smoothly, and mushrooms will become deformed.
◆ Mushroom cultivation: preparation
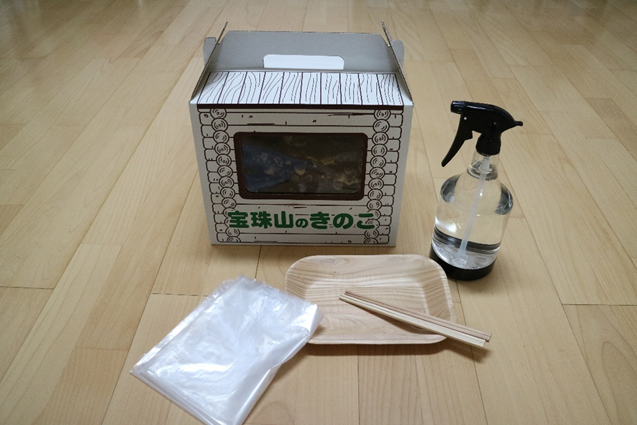
If the cultivation bed is dry when removed from the mushroom cultivation kit, moisten it quickly with water from the tap or from an atomizer before placing it atop the tray. Stand disposable chopsticks (or similar items) in the four corners of the tray, and cover with a plastic bag. As the mushrooms are susceptible to high temperature, direct sunlight, and dryness, take great care when selecting a suitable spot for cultivation.
◆ Mushroom cultivation
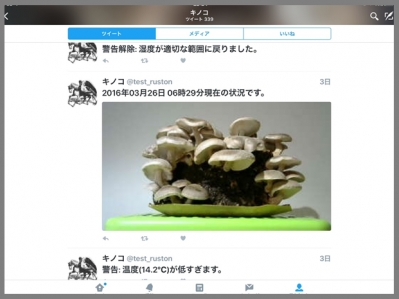
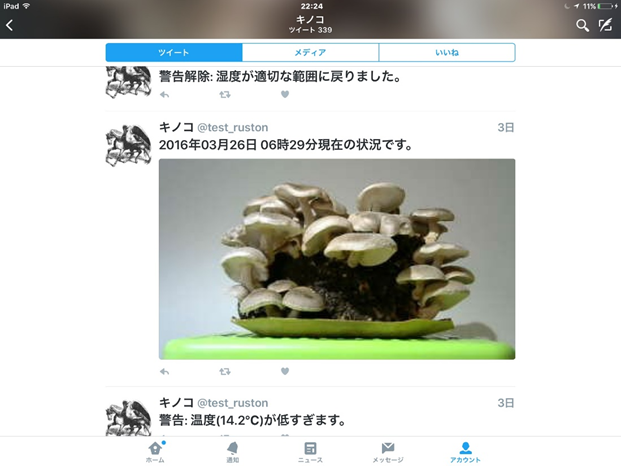
Mushroom cultivation requires appropriate temperature (10℃- 25℃) and humidity (65-70%) levels. It also normally requires ongoing temperature and humidity adjustments once set-up is completed. The gadget I created sends me a warning tweet whenever temperature and/or humidity levels moved away from the correct levels. Whenever humidity falls below standard level, replenish moisture with an atomizer. Dryness impedes growth and can cause deformity. Occasional culling helps mushrooms to grow bigger. The crop will be ready to harvest in 3 to 10 days.
The screen shots below show Twitter posts during the cultivation process.
Conclusion
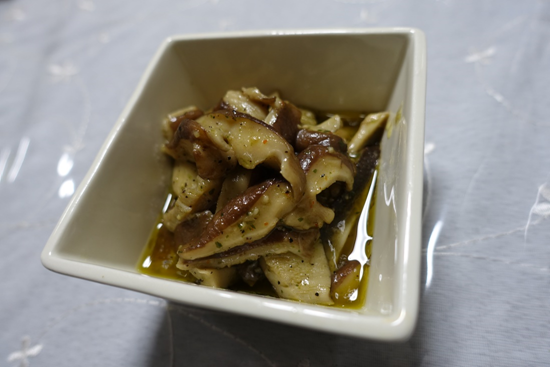
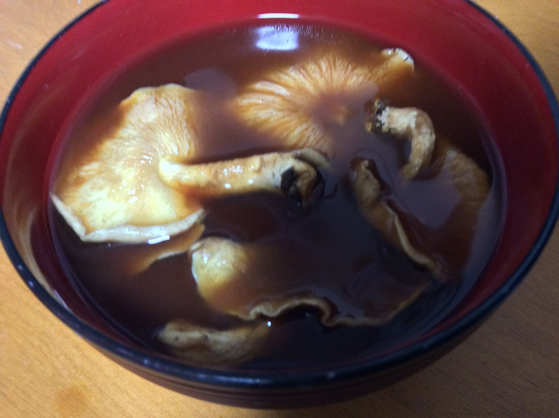
The gadget I created not only obtained values from sensors, but by linking it with Twitter, it became one of those “IoT” devices everyone is talking about. In hobby electronics, one of the problems for me was soldering the sensors into tiny holes – either too much or too little solder would come out. I was happy that the gadget I created enabled me to grow mushrooms successfully and even harvest them. I cooked the mushrooms I had grown myself, and found they tasted great!
◆ Ongoing issues and improvements
One challenge was keeping the gadget and all its supplementary parts from separating whenever moved during assembly and operations. It would be interesting to create a custom case using a 3D printer. Another challenge was taking decent photos during nighttime and in the darkened cultivation spot. Experimenting with a flash or night-vision camera might be the solution.
One future improvement might be use of a humidifier, allowing for automatic settings of humidity levels, as frequent moisturizing with an atomizer was difficult for me. Furthermore, storing and visualizing data in cloud services such as Microsoft Azure and Amazon Web Services (AWS) might help optimize ideal cultivation conditions.
◆ Acknowledgements
◆ I am grateful to Shamoto-san, Shibuki-san, and Ishino-san of Shaxware Inc. for their kind and enthusiastic support. I extend my heartfelt thanks to each and every one of them.
Appendiceis
◆ Component List
| Component | Description | Cost (tax incl.) |
| GR-PEACH Full | Single-board computer | 9,690 yen |
| AE-HDC1000 | Temperature/humidity sensor | 680 yen |
| AE-AQM0802 | LCD | 600 yen |
| Pin Header | Pin Header | 526 yen |
| Jump wire | Jump wire | 508 yen |
| BB-601 | Breadboard | 120 yen x2 |
| Vanilla shield with electronic components | 400 yen | |
|
For GR-PEACH and vanilla shield attachment |
185 yen x2 | |
| LOGICOOL C270 | Webcam | 2,551 yen |
| OTG cable | OTG cable | 385 yen |
* Price as of this writing
◆ Library List
| Name | Description |
| HDC1000 | Library for HDC1000 (temperature/humidity sensor) |
| AQM0802 | Library for AQM0802 (LCD) |
| USBHostC270 USBHostCam USBHost_Addlso |
Library for USB cameras |
| SDFileSystem | Library for SD cards |
| ConfigFile | Library for configuration files |
| EthernetInterface | Library for Ethernet |
| HTTPClient | Library for HTTP |
| NTPClient | Library for NTP |
◆ Setting file specifications
| Item | Type | Default value | Description | |
| TemperatureMax | float (℃) | 10 | Maximum temperature for mushroom cultivation; HDC1000 measurement range = -20℃ - 85℃ | |
| TemperatureMin | float (℃) | 25 | Minimum temperature for mushroom cultivation Same usage limitations as TemperatureMax. | |
| HumidityMax | float (%) | 65 | Maximum humidity for mushroom cultivation; 100% | |
| HumidityMin | float (%) | 70 | Minimum humidity for mushroom cultivation; 0% | |
| WarningInterval | float (seconds) | 30 * 1000 | Interval of warnings posted on Twitter: Using the internal timer class, maximum value is 35*1000 seconds. Twitter specifies minimum interval of 60 seconds | |
| CameraInterval |
float (seconds) |
30 * 1000 | Camera recording interval: Same usage limitations as WarningInterval. | |
| NTPServer | char | ntp.tohoku.ac.jp | NTP server | |
| TwitterProxy | char |
|
||
| Token | char | |||
| TokenSecret | cha |
Currently studying computer science at a university specializing in information systems. Hobbies: Fooling around with GR-PEACH, Raspberry Pi and other fun stuff.
Spare time: Participating in IT-related study groups to learn about cutting edge technology. Stepping out of my comfort to give Lightning Talks (LT), 5-minute presentations on the topic of one’s choosing!
http://kuxumarin.hatenablog.com/
Follow