
Title:Mini PC Using GR-CITRUS
Displayed Name:@takjn
| Concept / Overview |
|---|
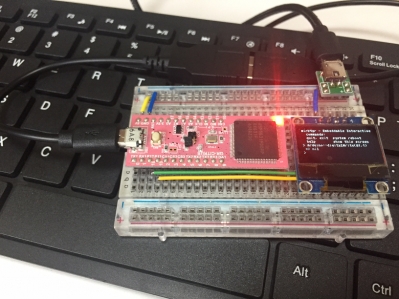
| I made a stand-alone mini-PC using the features of GR-CITRUS, which embeds the programming language mruby. You can input mruby codes using a USB keyboard and execute them on the spot. |
Introduction and Notes
Normally, mruby is the standard library for GR-CITRUS, but program development and execution require a PC and Rubic, which is an IDE application for Ruby programming. With this gadget, mruby codes can be input directly and executed on the spot using a USB keyboard.
Notes
- This gadget is for experimenting with mruby and your MCU. It is not a practical application; it cannot edit, save, or upload programs
- From a technical standpoint, the firmware is a simplified version of GR-CITRUS and ported on GR-CITRUS. mirb is for use with GR-CITRUS. mirb is an mruby-standard interactive environment, and is a tool to input and execute mruby expressions.
- This gadget is compatible with mruby version 1.2. It cannot work with the latest version of mruby (ver. 1.3, available as of August 2017).
- The firmware is not compatible with the standard GR-CITRUS firmware based on mruby. Only a limited number of classes can be used on this gadget . If you want to know which classes can be used, please refer to the source codes of this gadget and mruby-arduino source code.
- You will need to use a keyboard with a US (English) layout, and I have found that some USB keyboards don’t work. If you have problems, disconnect the keyboard and try again, or try another keyboard.
Circuit Diagram & Component List
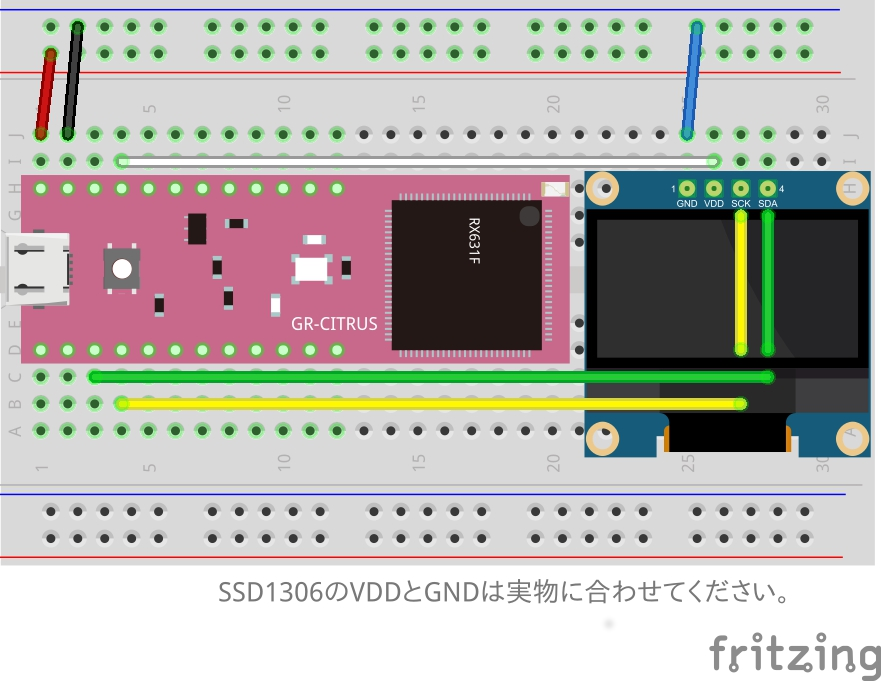
Circuit Diagram
Component list
| Name | # | Description |
|---|---|---|
| GR-CITRUS (FULL) | 1 | Available at Akazuki Denshi. |
| SSD1306 I2C OLED Module | 1 | Available on Amazon.co.jp |
|
USB connector for power source |
1 | Available at Akazuki Denshi. This is for power supply. You can also use a DC jack and AC adapter. |
| Micro USB cable for power source | 1 | |
|
Micro USB conversion cable(B-mail <--> A-female) |
1 | For connecting the USB memory or keyboard to a smartphone. You can modify your own or buy one at a 100 yen shop. |
| Metal film resister 15kΩ | 2 | For modifying the micro USB conversion cable. |
| Breadboard, jumper wire | 1 | |
| USB keyboard | 1 | Recommendation: US (standard English) keyboard |
Notes
- VDD and GND of SSD1306 may be reversed, depending on the SSD1306 manufacturer. Read the lettering on the components carefully before connecting them.
- Be careful not to confuse 5V and 3.3V when connecting components. Make sure you connect SSD1306 with 3.3V.
- The startup message will appear as soon as the power is supplied. If you don’t see the display, make sure there are no circuit-related problems.
- The keyboard is recognized within about 3 seconds after it is connected. The gadget may not recognize the keyboard if there is insufficient power. If you want to connect a servo motor or something like this ,try using additional power.
How to assemble the mini PC
Prepare the cable to connect the USB keyboard
The MCU needs to be set to USB host mode in order to connect the USB keyboard. However, GR-CITRUS is not equipped with the circuit used for the USB host function (unlike GR-SAKURA). So we need to make this USB host function circuit by modifying a micro-USB cable.
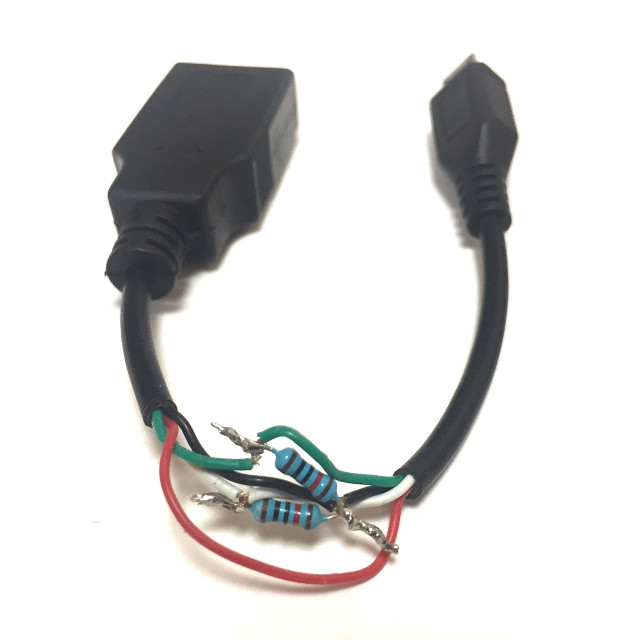
- Remove the film from the exterior of the conversion cable.
- You should see four internal wires (red: +5V, black: GND, green: DATA+, and white: DATA-).
- Cut the green, white, and black wires. Solder a 15kΩ resistor between the green and black wires, and also between the white and black wires.
- Wrap the green and white wires with vinyl tape to insulate and prevent them from shorting.
Supplement
Some keyboards may operate even without modifying the micro-USB conversion cable. To save time, feel free to try the keyboard out to see if it responds as is.
Writing the program
- Connect GR-CITRUS to the PC, press the reset button so that the PC recognizes it as the USB drive.
- Download https://github.com/takjn/mirb4gr/raw/master/citrus_sketch.bin and write it to GR-CITRUS.
- Disconnect GR-CITRUS from the PC and mount it on the breadboard.
- Connect the USB cable to the USB connector on GR-CITRUS and connect the USB keyboard.
- Be sure to confirm that plus (+) and minus (–) are not reversed and there is no short in the connection.
- Connect the micro-USB cable to the power.
- Check to see the startup message.
Serial communication connection
You can also connect the gadget to PC with serial communication using a USB serial conversion module or Bluetooth SPP module. The keyboard inputs are also output to the serial. On the other hand, input data from the serial are output to the OLED as well.
- Connect pins 0 and 1 (Serial 1) on GR-CITRUS with the serial conversion module’s TX and RX pins.
- Select GR-CITRUS on the terminal software. Baud rate = 115200bps.
- Some operating systems and terminal software do not display the startup message. Push the enter key and look for a prompt.
Sample Program
Basic Arduino functions can be used because the mruby-arduino module is embedded in the system in addition to mruby basic syntax. To use Arduino methods or classes, clearly specify the Arduino module, as shown in the example below.
Turn LED on and off manually:
> extend Arduino      # load "mruby-arduino" module
 => main
> digitalWrite(61, 1) # LED On  (61 = Built-in LED on GR-CITRUS)
 => nil
> digitalWrite(61, 0) # LED Off
 => nil
Define the method to make the LED blink:
> extend Arduino
 => main
> def blink
*       10.times do
*               digitalWrite(61, 1)
*               delay 1000
*               digitalWrite(61, 0)
*               delay 1000
*       end
* end
 => :blink
> blink
Define the class to make the LED blink:
> class GR_CITRUS
*       include Arduino
*       include PinsArduino
*       def run
*               10.times do
*                       digitalWrite(PIN_LED0, HIGH)
*                       delay 1000
*                       digitalWrite(PIN_LED0, LOW)
*                       delay 1000
*               end
*       end
* end
 => :run
> GR_CITRUS.new.run
Turn on the servo manually (Connect the servo control pin to pin 10 on GR-CITRUS):
> extend Arduino
 => main
> s = Servo.new
 => #
> s.attach(10)
 => nil
> s.write(180)
 => nil
> s.write(90)
 => nil
>
I am a software engineer for web systems, but an amateur in terms of hardware development. I create electronic gadgets for fun.
The source code is available at GitHub. I look forward to your pull requests!
https://github.com/takjn
